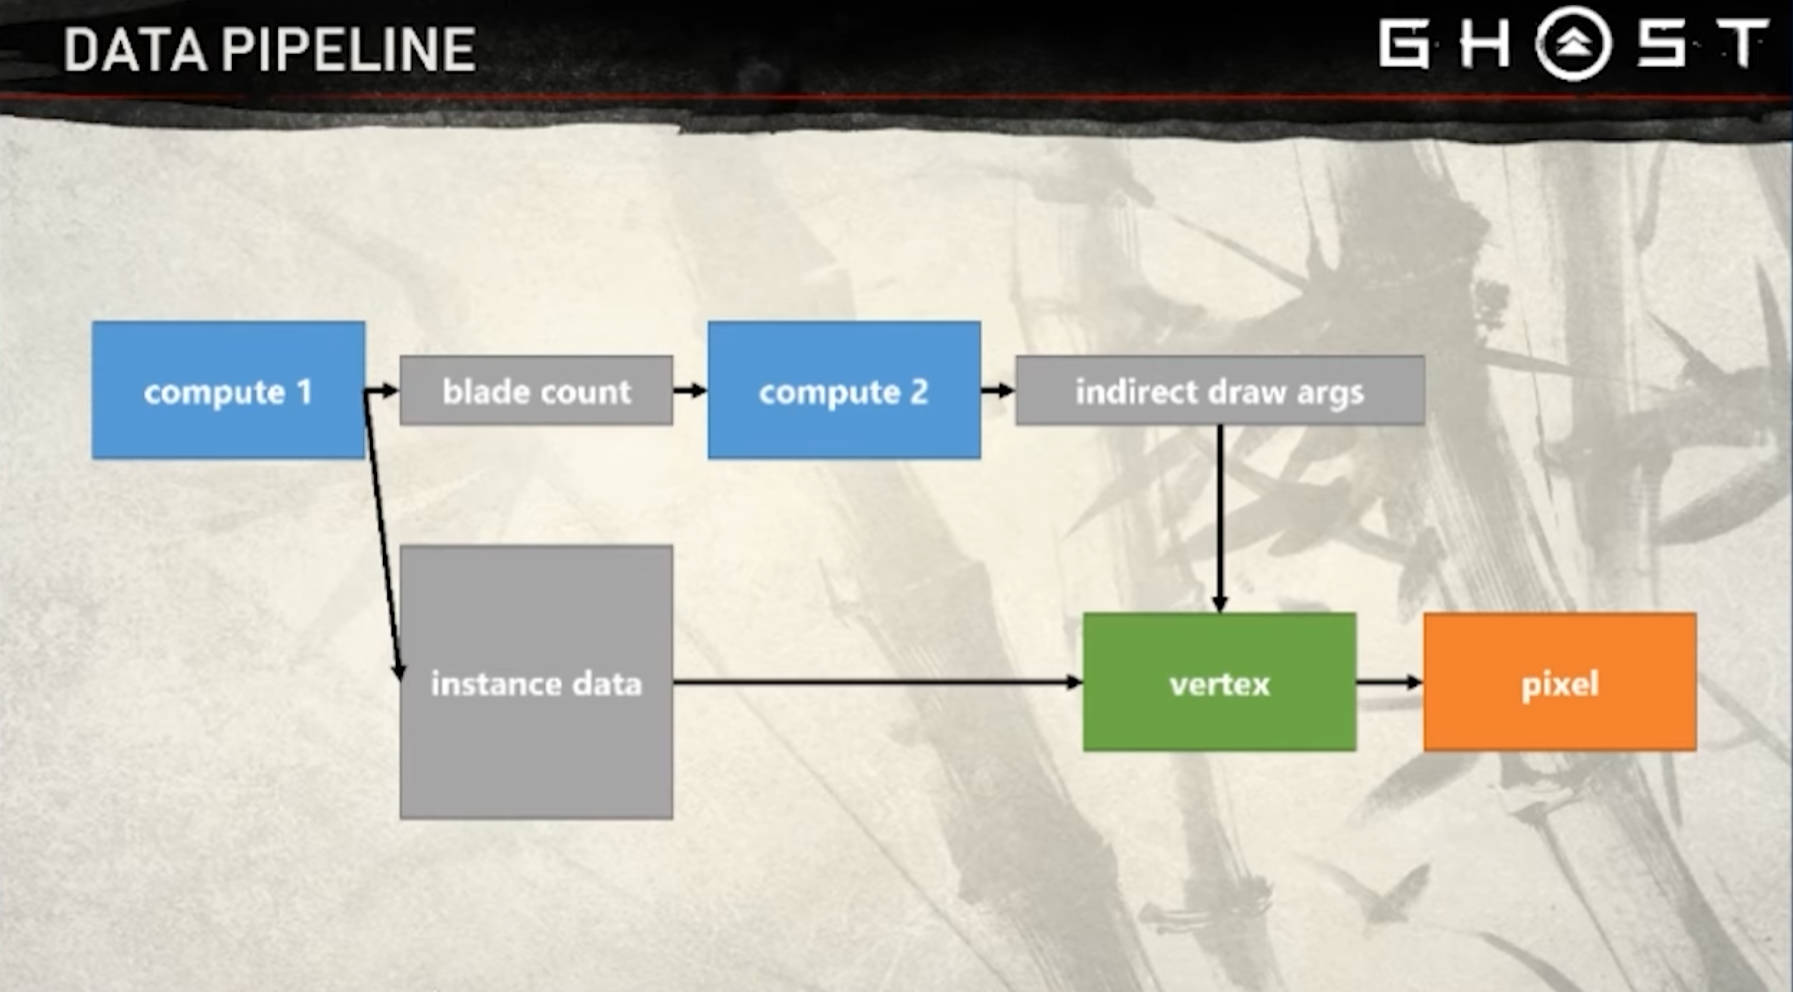
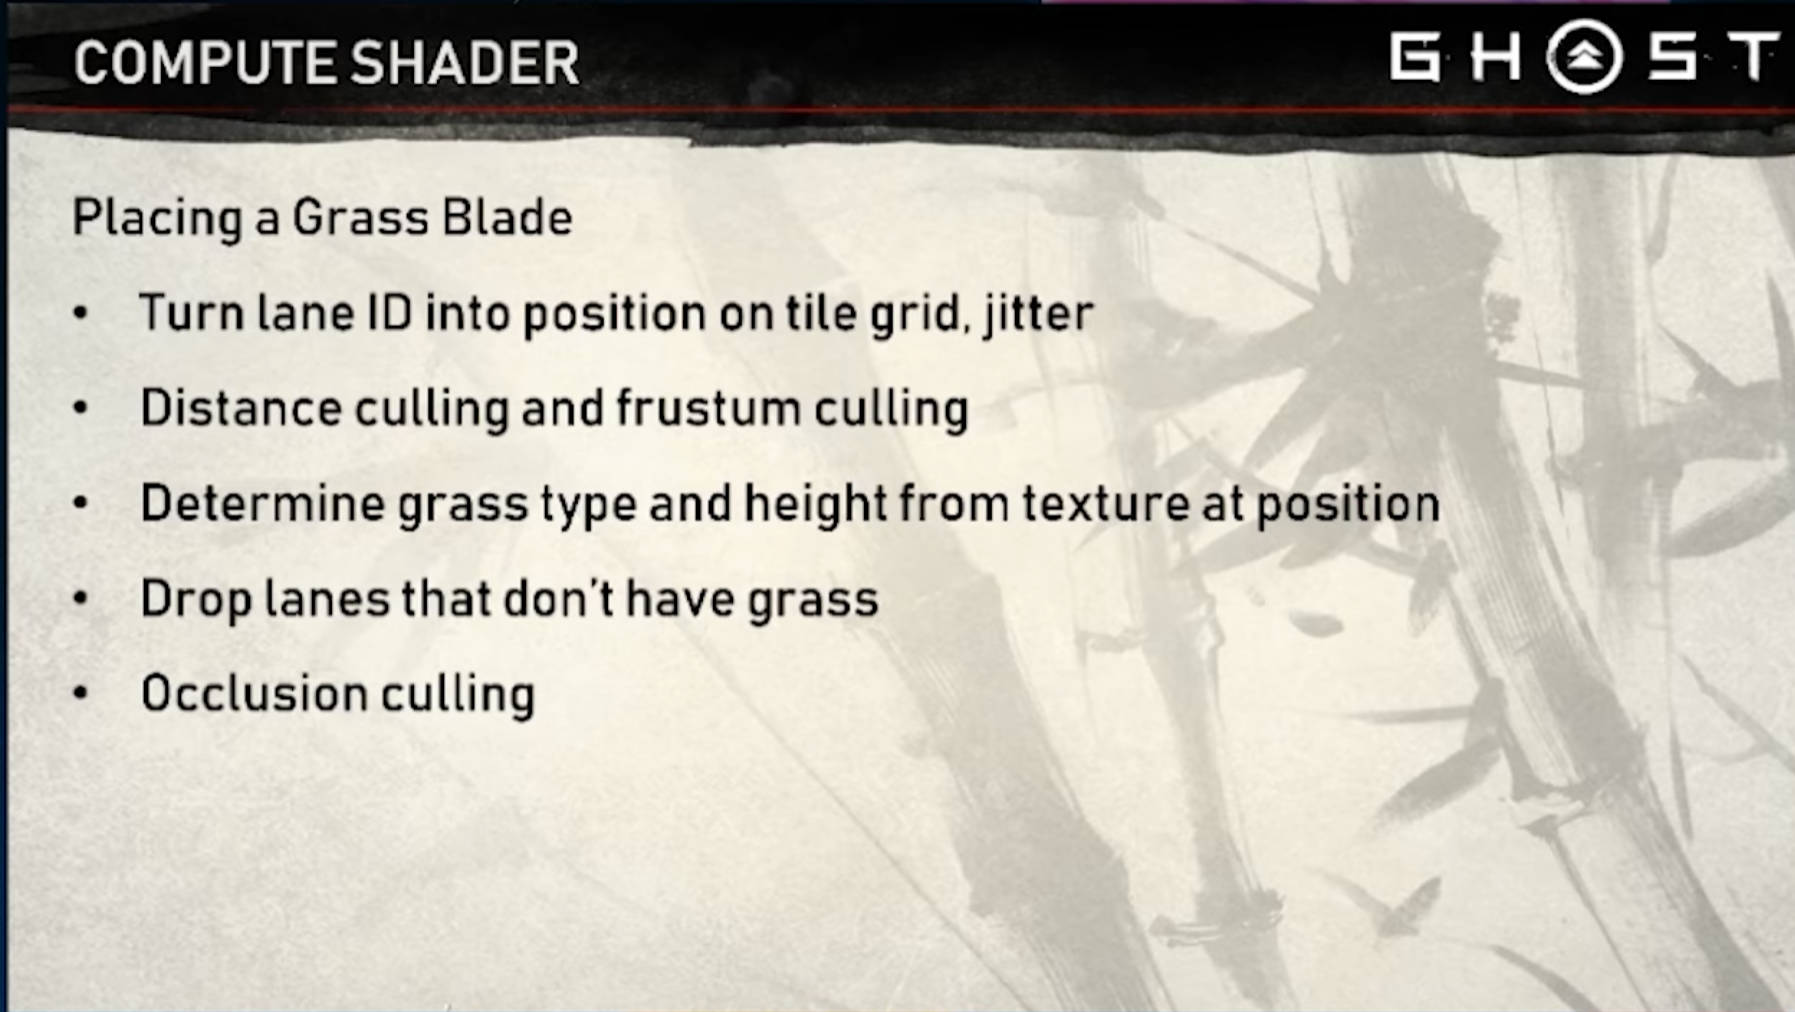
概述 运行一个计算着色器:计算着色器的每个线程计算一片草叶。首先,计算一个位置:叶片均匀分布在地形上,略有抖动。我们通过对该位置进行截锥体和距离剔除来检查草叶是否需要被渲染。如果草叶被渲染,我们继续,否则退出。每片草叶都属于特定的一丛。每种团块类型都有自己由艺术家创作的参数,决定草叶的高度、弯曲度和颜色。草叶的计算参数被打包到GrassBlade结构体中,并添加到AppendBuffer中。
_注意: _使用AppendBuffer而非RWStructuredBuffer更方便,因为每帧渲染的刀片数量因视锥体和距离剔除而变化。不过,也可以使用RWStructuredBuffer,正如Acerolas关于草地渲染的视频 所示。
然后顶点着色器用 Graphics.DrawProceduralIndirect()渲染多片草叶。草叶 Mesh, 顶点颜色中包含了数据,比如顶点在叶片上的距离,以及它在草叶的哪一侧。
_注意: _顶点着色器需要知道要绘制多少刀片。这是通过使用 ComputeBuffer.CopyCount() 将 AppendBuffer 的大小复制到 DrawProceduralIndirect() 的 indirectArgsBuffer 中实现的。
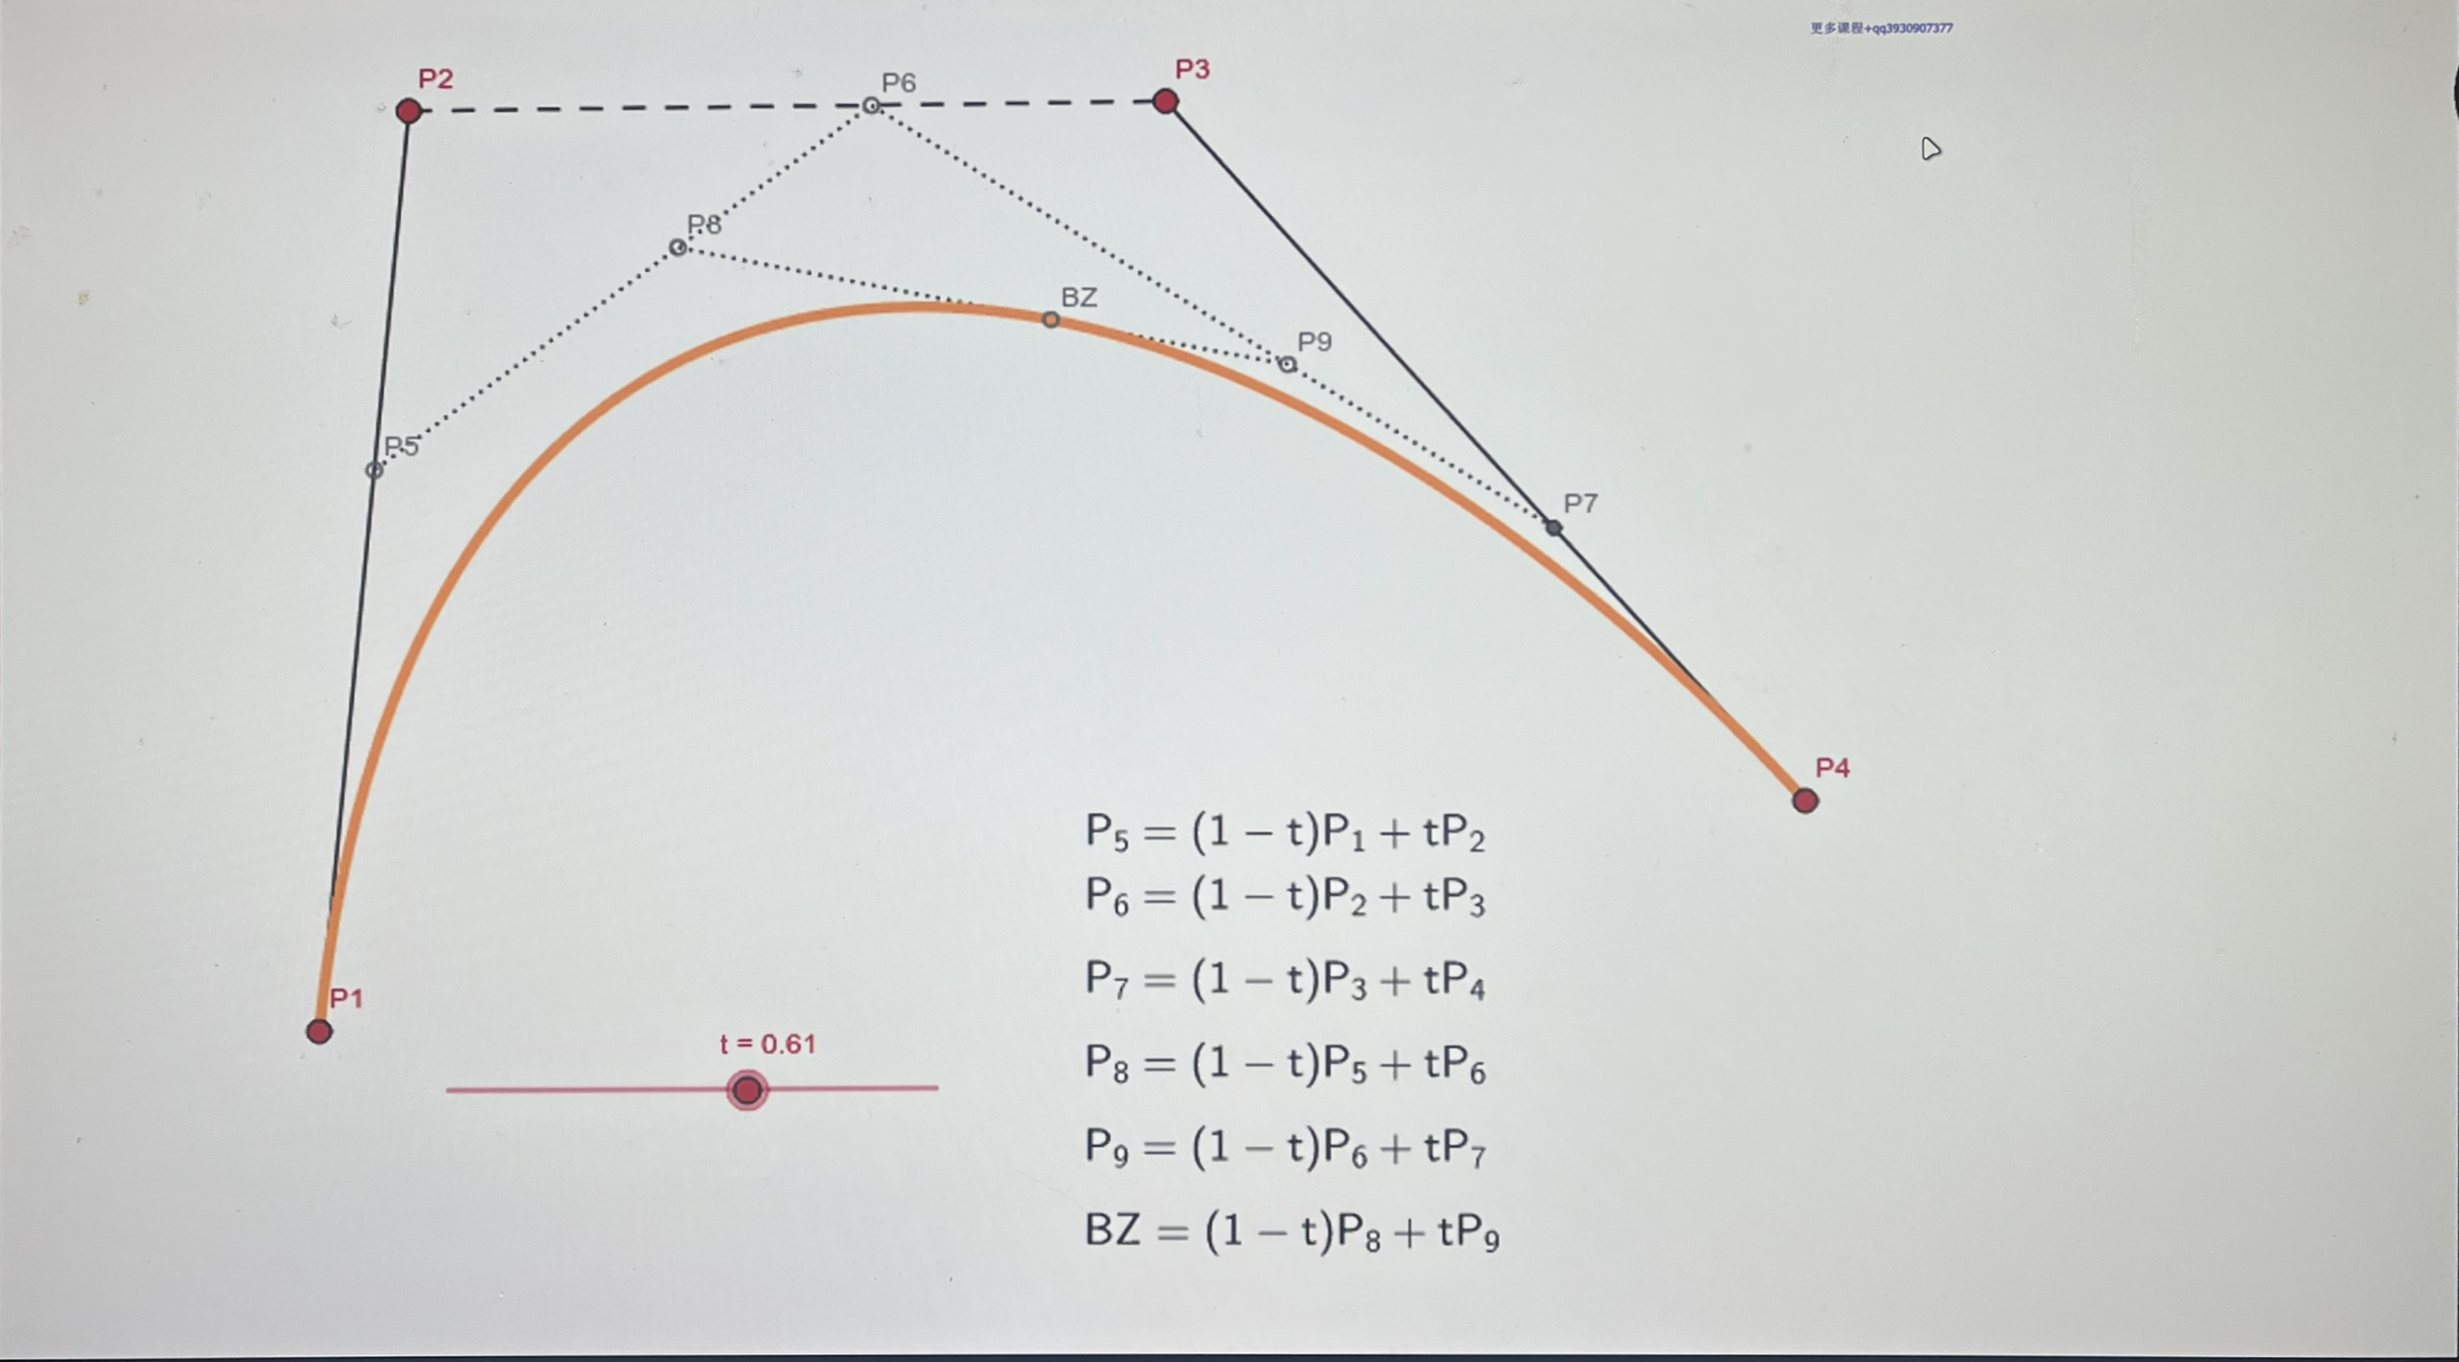
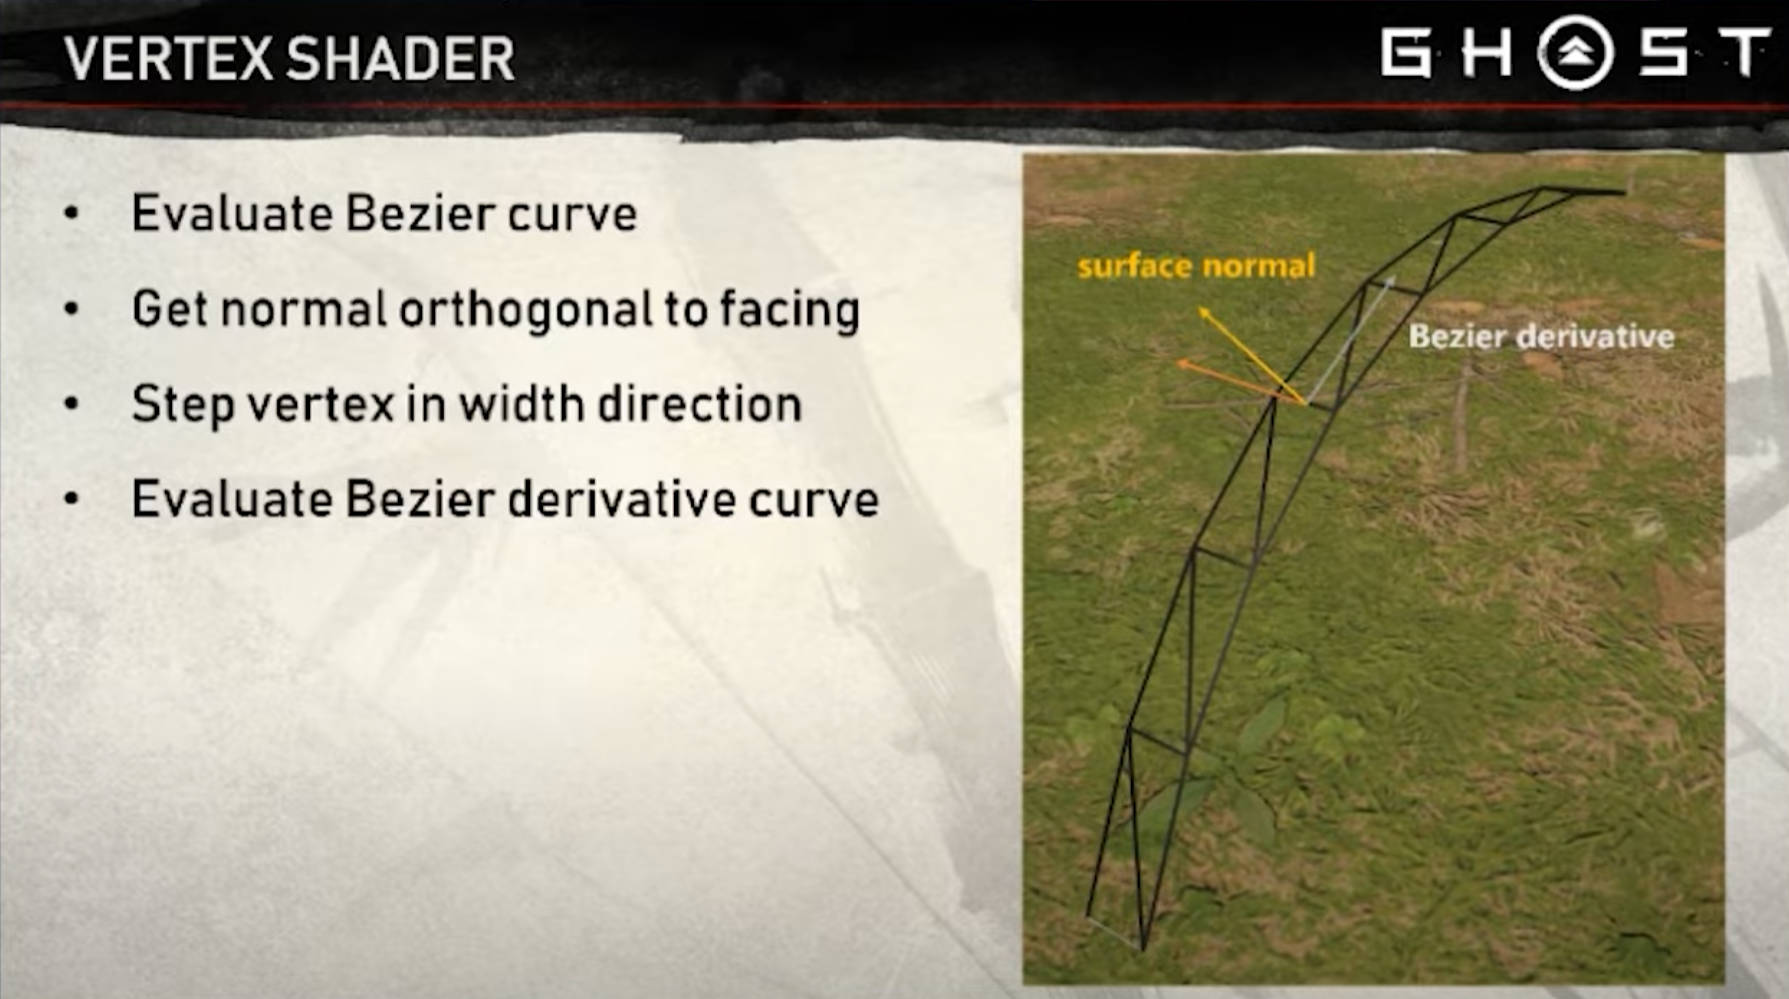
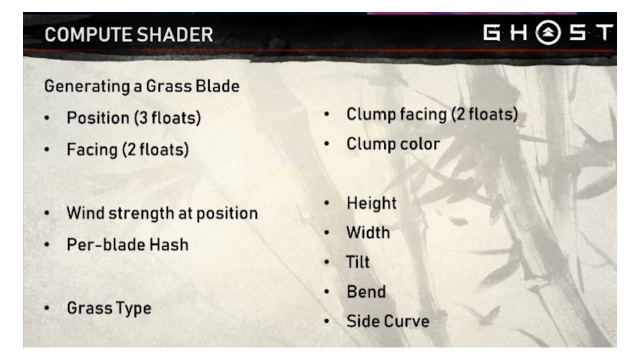
在顶点着色器中,我们可以索引到位于GPU上的GrassBlades缓冲区,获取当前草叶的参数。草叶的放置基于由 GrassBlade 参数确定的贝塞尔曲线。由于我们使用贝塞尔曲线,也很容易获得顶点的法线,交叉曲线的切线(容易计算),与边向量相交。我们还通过根据风力移动贝塞尔曲线的点来在顶点着色器中对刀刃进行动画。
在片段着色器中,我们对程序生成的几何体进行光照(Phong Shading)和着色。
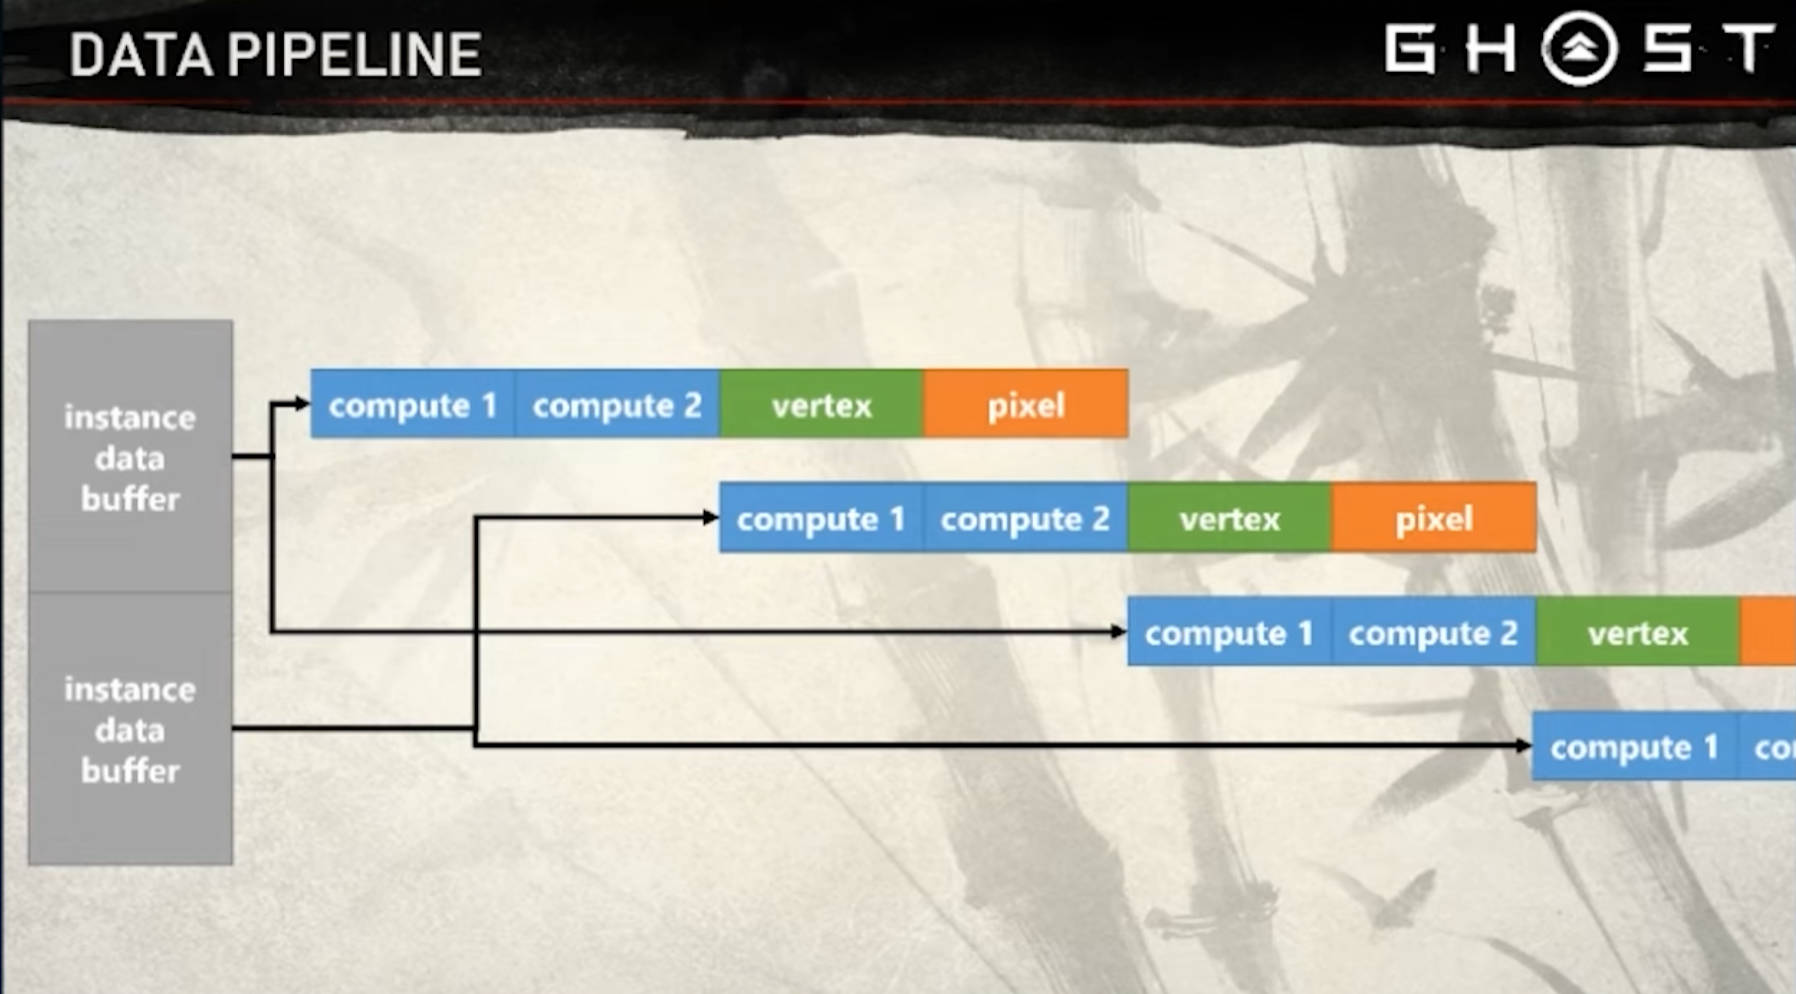
数据管线
流水线,并行,双缓冲 Buffer 策略,执行 8 个 Compute Shader
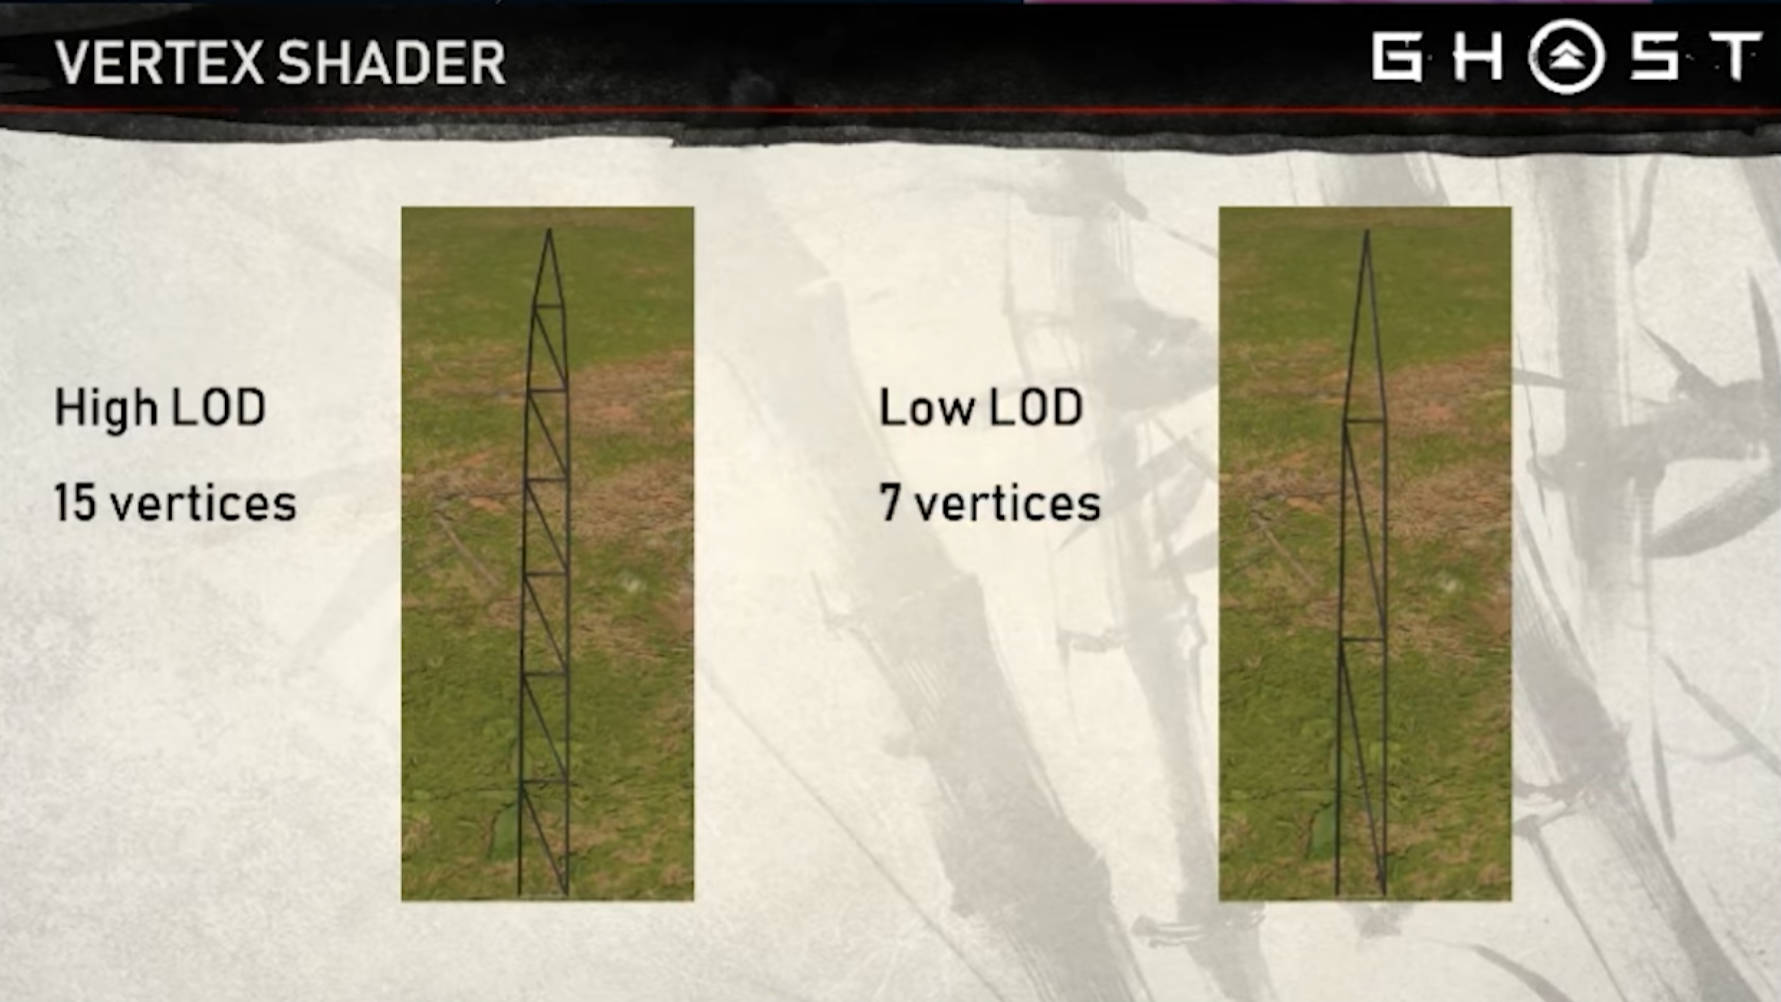
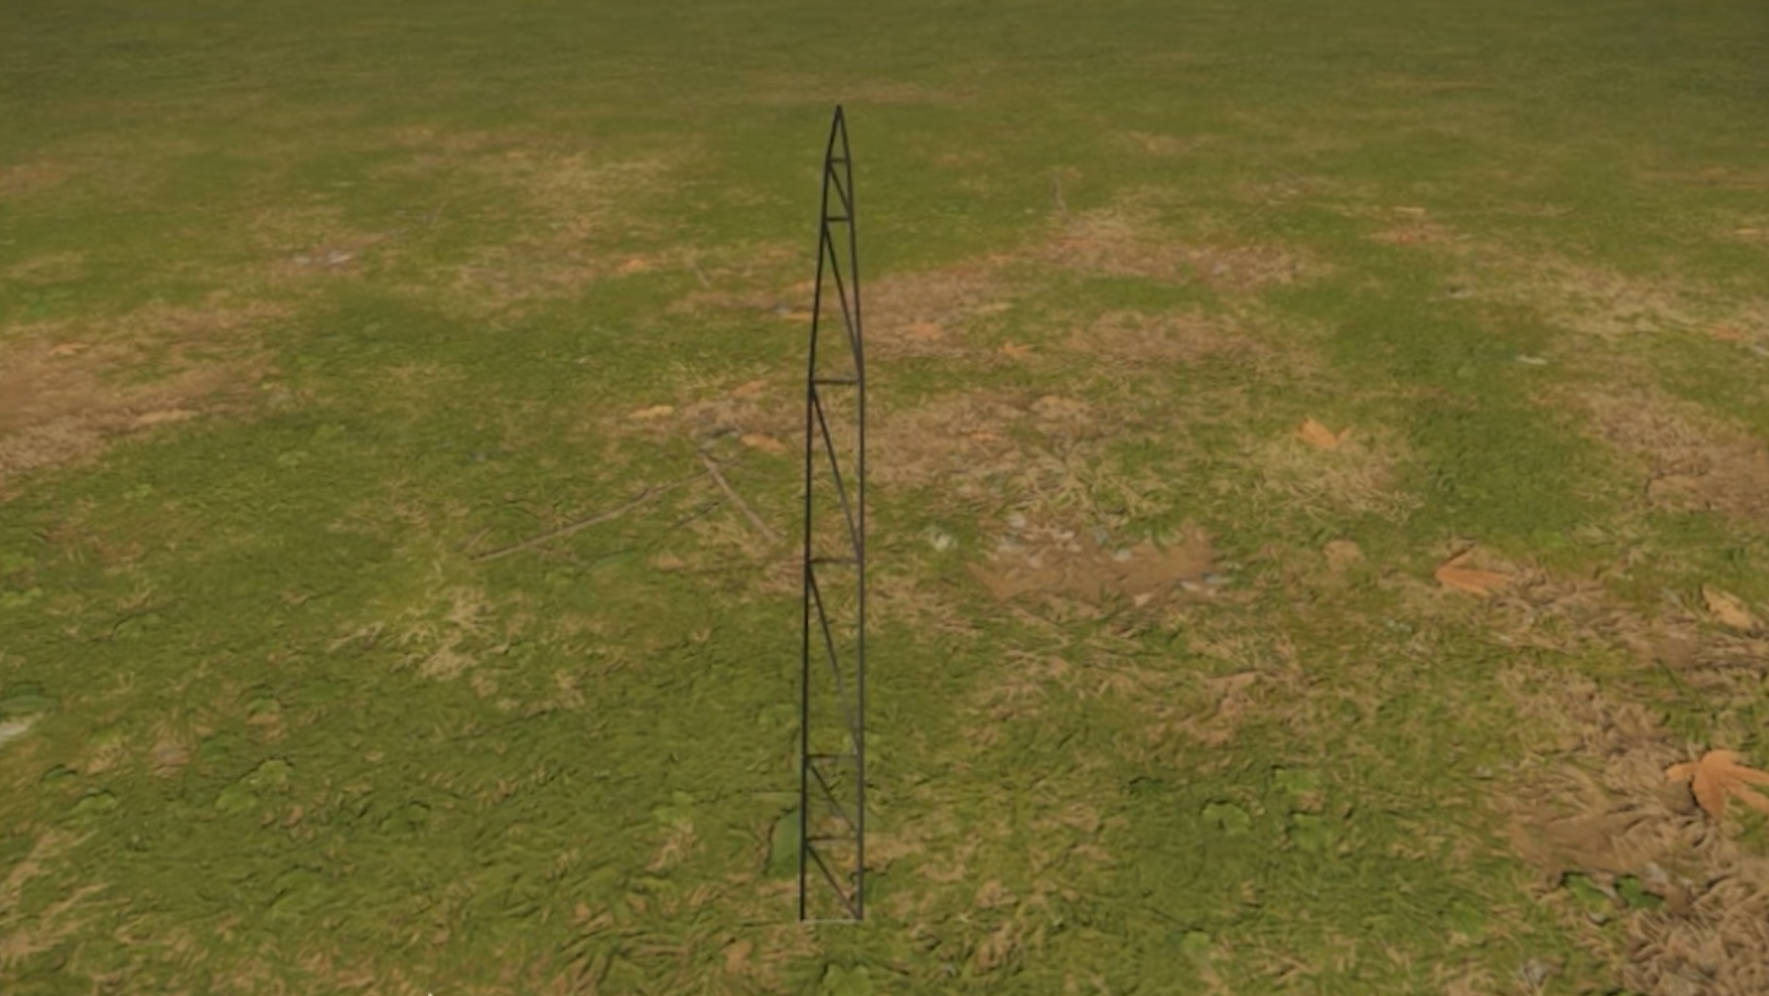
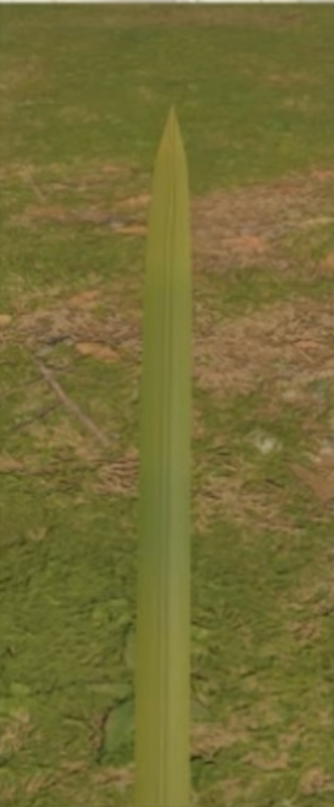
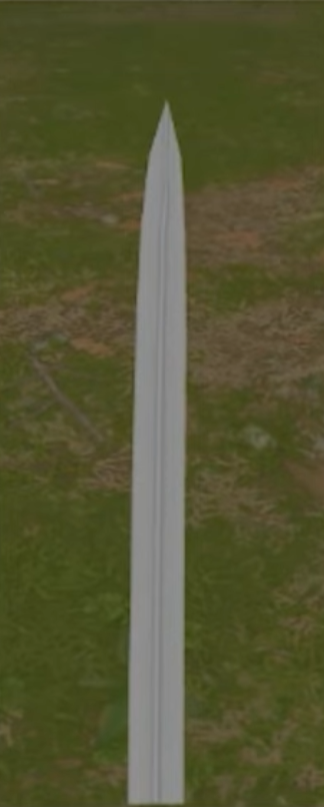
草叶建模与材质 Mesh 基础草叶网格模型创建 区分不同 LOD 的顶点数。顶点颜色记录叶片信息
Tick 将草的顶点重新分配到草尖
草叶的大部分弯曲通常集中在草叶尖端。如果顶点分布均匀,就会导致用于代表锯片底部直线几何形状的顶点被浪费。通过调整参数,垂直点可以更向叶片尖端(需要的地方)分布。
短草Mesh,一个Mesh 折叠作为2颗草,顶点Color标记是左右侧草
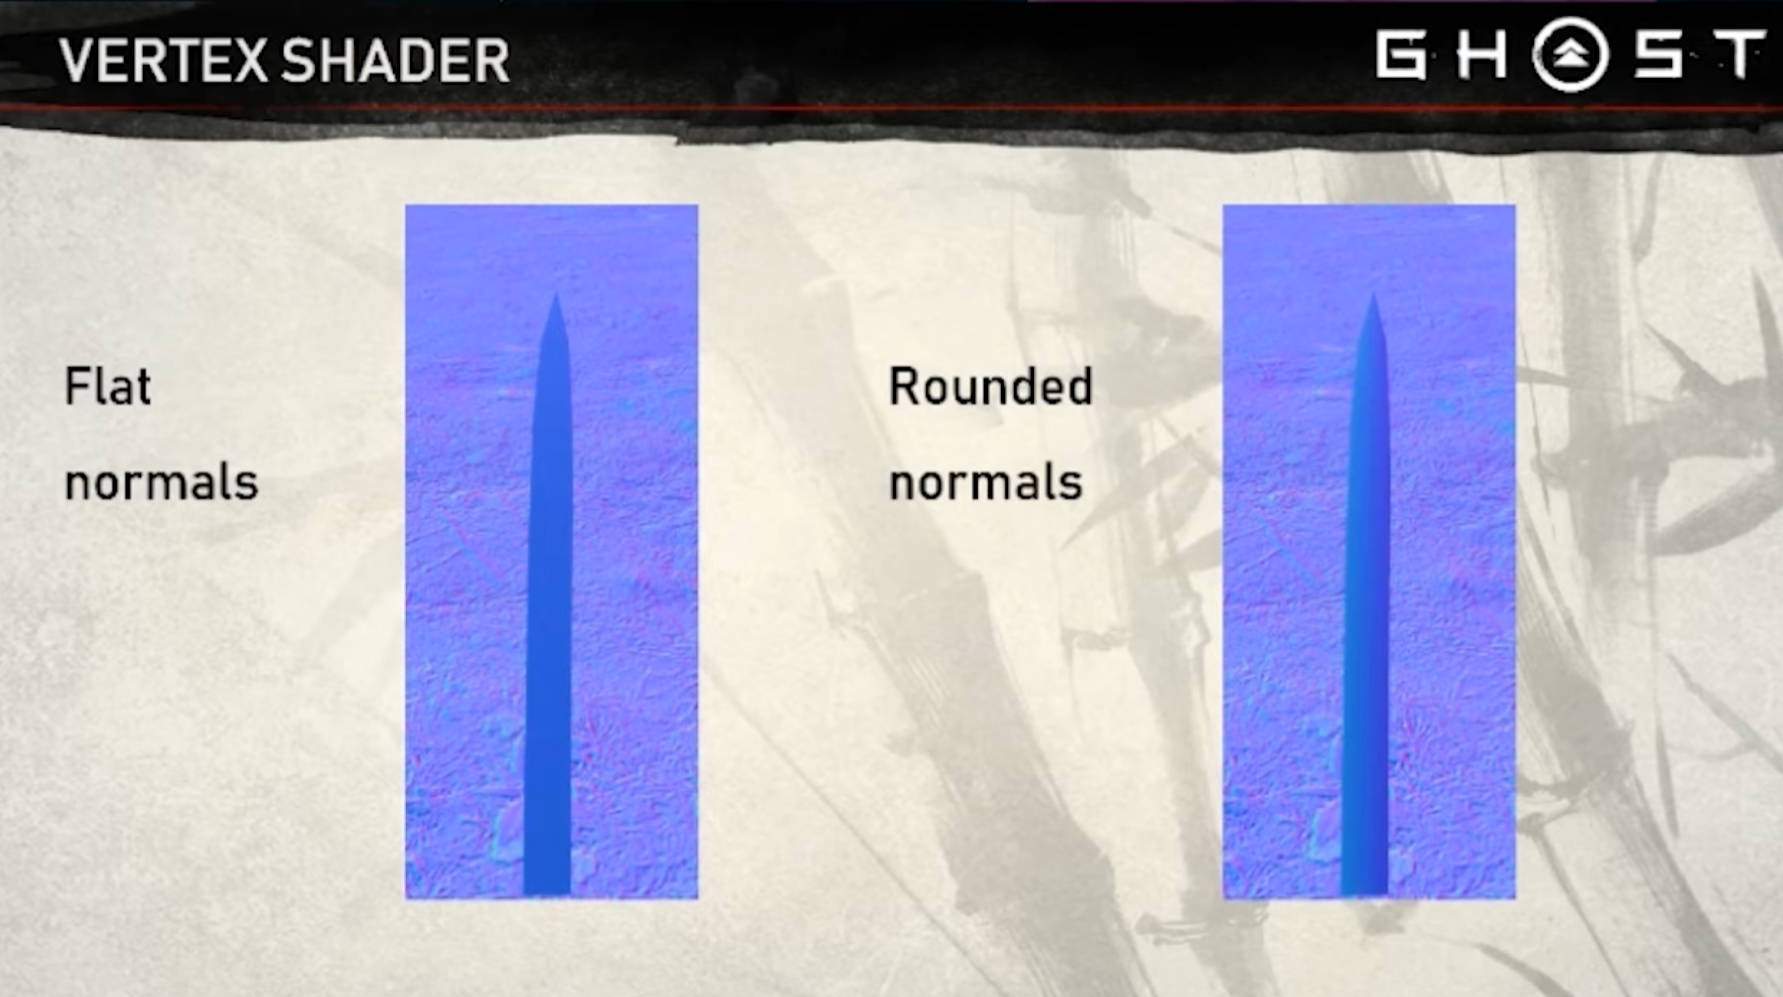
曲面法线
刀刃的法线可以向外倾斜,以呈现曲率的外观。这样能让叶片看起来更立体、更饱满,同时又不会增加额外的顶点。
将法线与远距离的表面法线混合
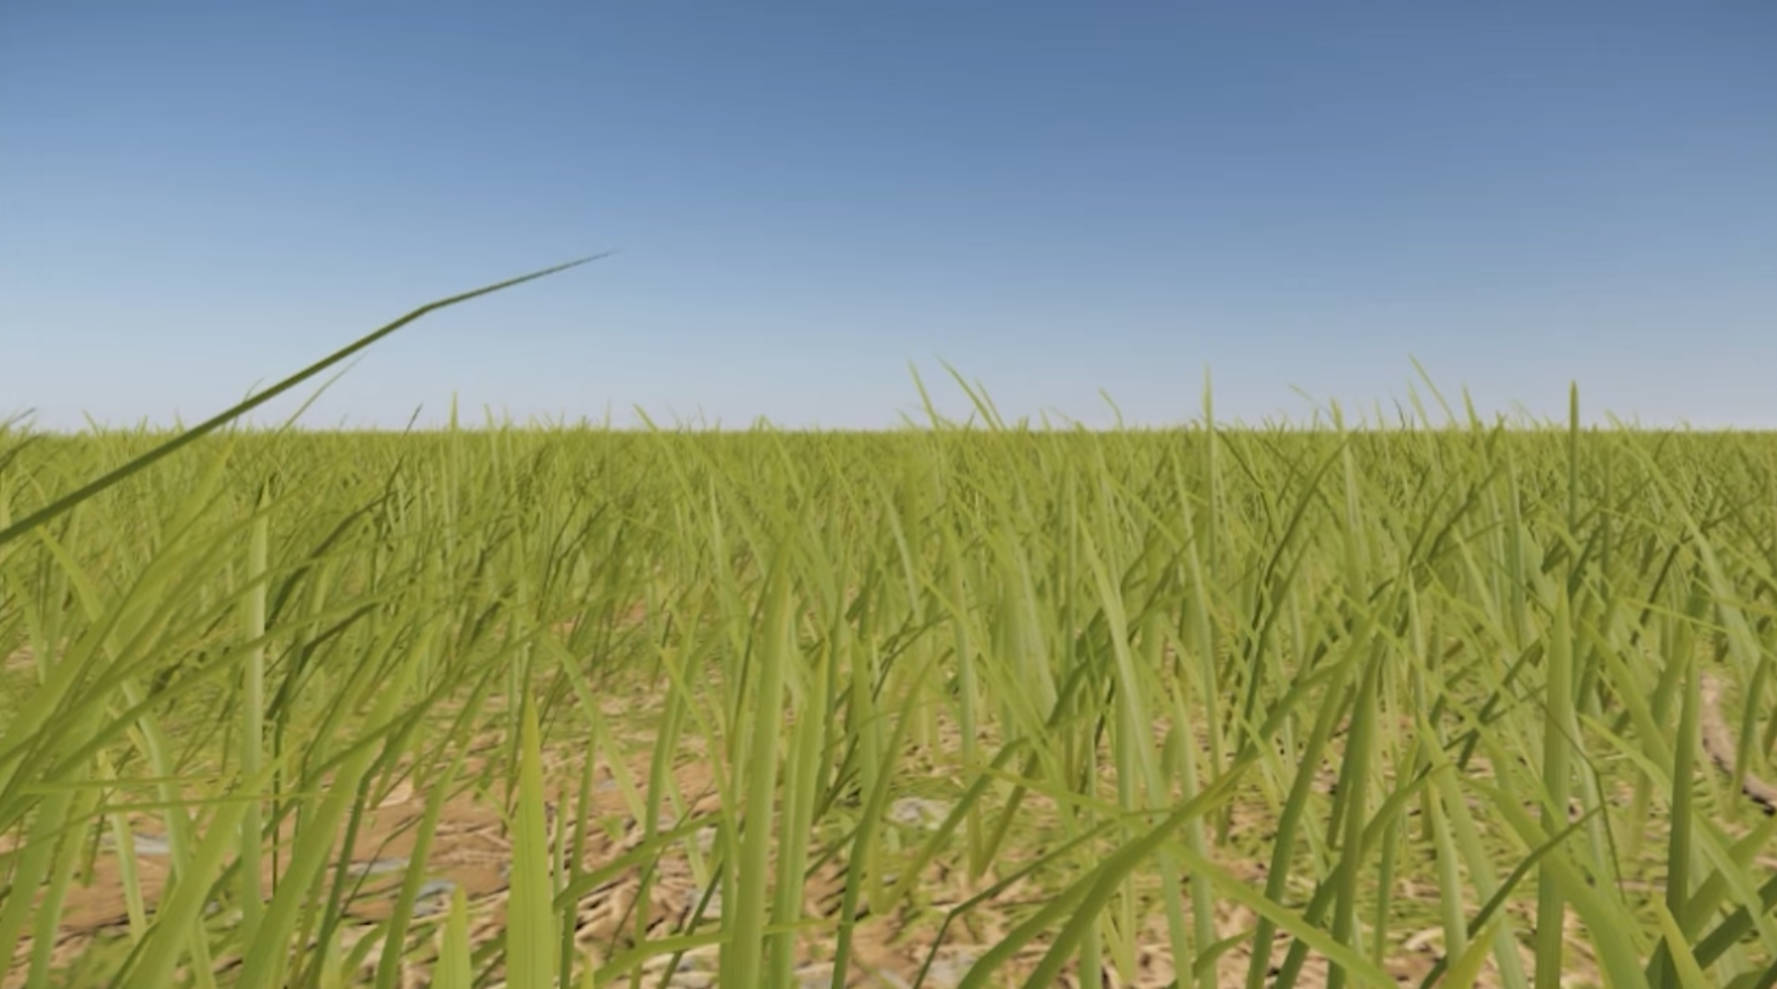
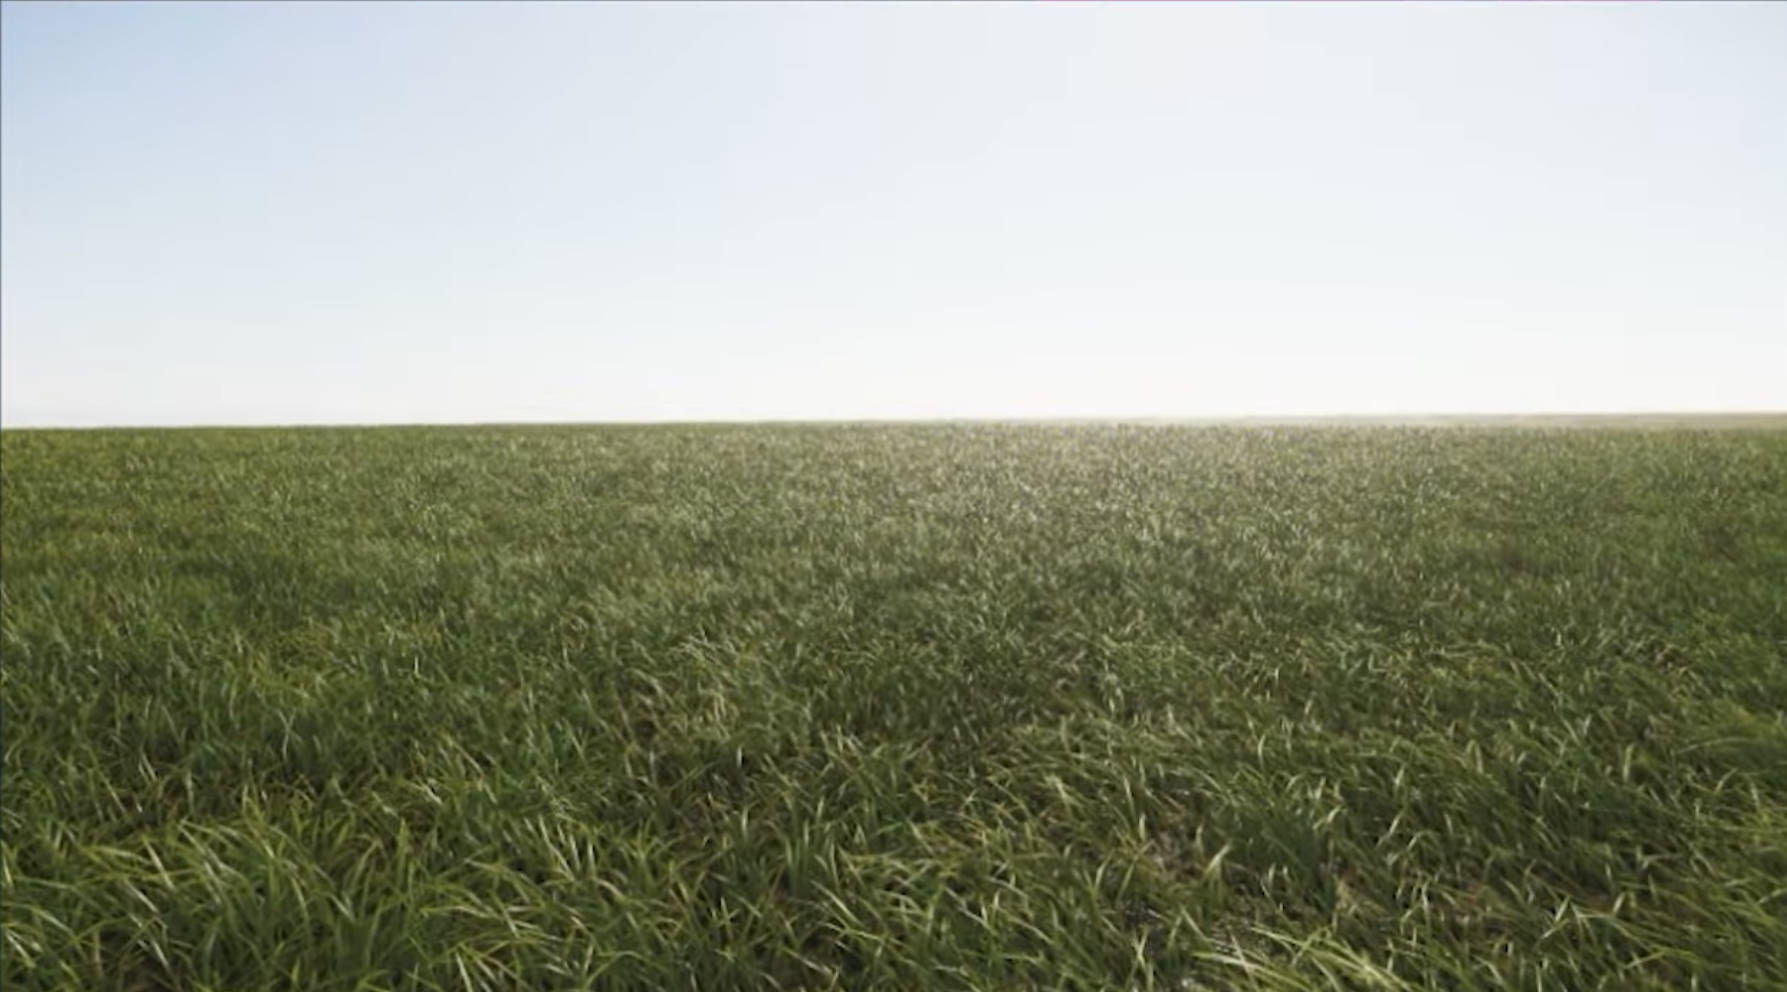
即使采用了时间抗锯齿,草坪在远处仍可能非常颗粒感和锯齿,因为草叶不断移动,以及光泽高光。为缓解这一问题,可以将叶片的法线偏向远距离底层地形的法线。这导致噪点和颗粒感更少,因为法线在屏幕空间中变化较小。
一些处理远处草坪的小技巧:
将远处地形的颜色与草地顶层颜色相匹配。这会造成远处草密度相同的错觉,尽管草被大量砍伐。
远处让刀刃底部的环境遮挡逐渐消失。远处看到黑暗或阴影的斑点看起来很不自然。
侧视时重新对齐叶片的垂直方向
玩家经常正好侧面看草坪——导致草地非常稀薄,甚至看不见。在这种情况下,垂直点可以倾斜,更朝向玩家的视角。这是通过在锯片面大致垂直于视野矢量时,稍微移动垂直点来实现的。每个顶点在该点绕贝塞尔曲线的切线旋转。
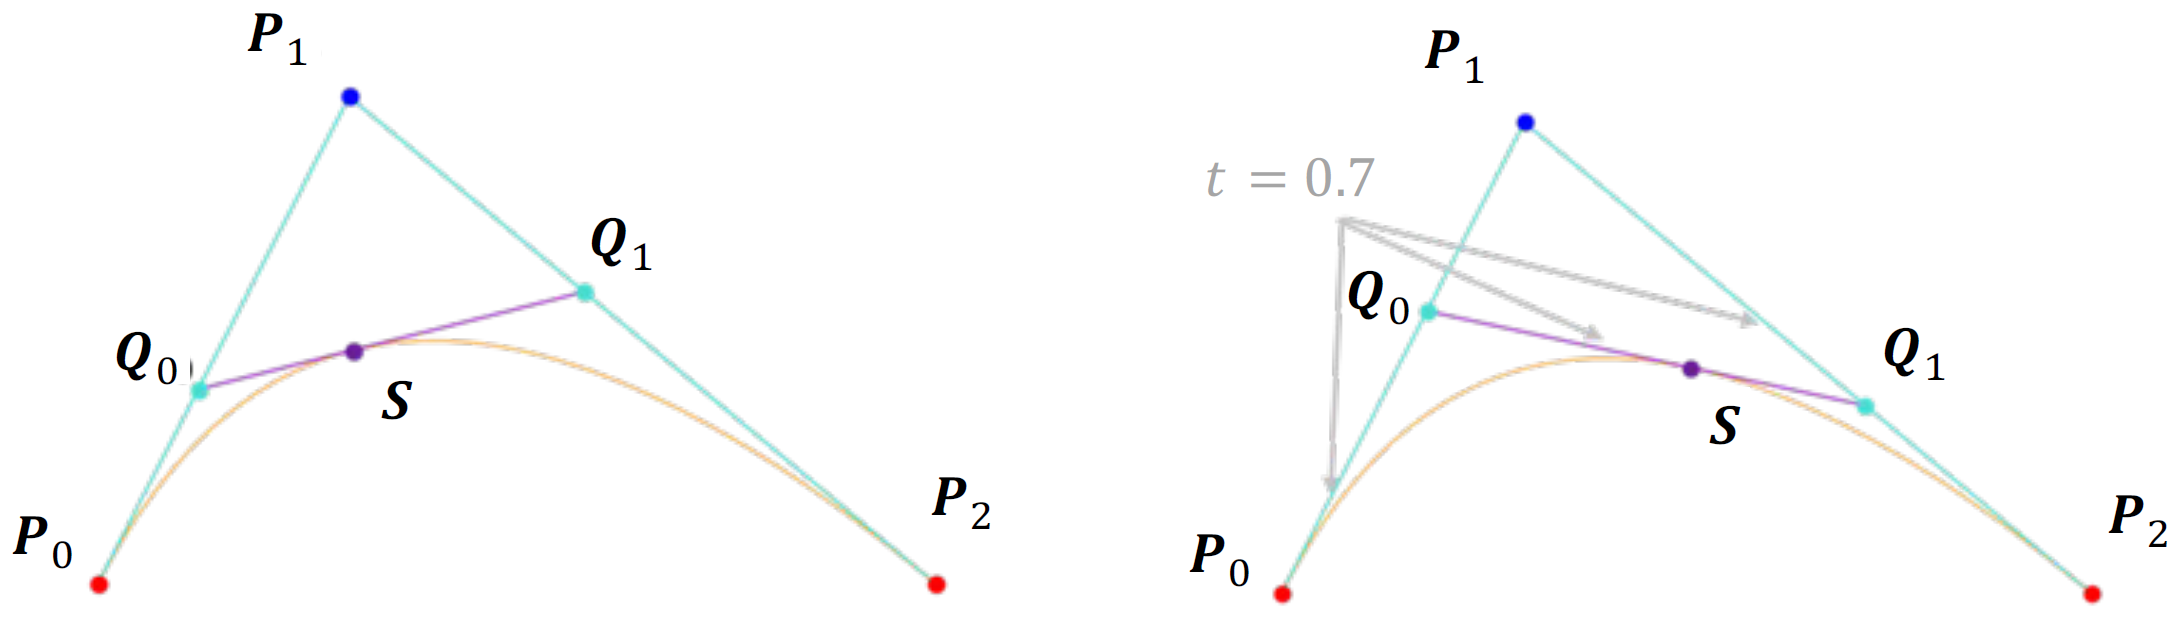
Vertex Shader Bezier 曲线草叶 理论与应用 :::color1一文全面解析贝塞尔曲线
6.3. 贝塞尔曲线 — 可视计算与交互概论
:::
贝塞尔曲线(Bézier curve) 是图形学、工程学、设计学等领域最常用的一类高阶曲线,由法国工程师皮埃尔·贝塞尔(Pierre Bézier)在20世纪60年代为汽车工业开发。贝塞尔曲线的定义非常简单,并且具有很好的几何性质。
三次贝塞尔曲线 方程
贝塞尔曲线导数
Unity 中实践 Cubic Bezier 曲线函数
1 2 3 4 5 6 7 8 9 10 11 12 13 14 15 16 17 18 19 20 21 22 23 24 25 26 27 28 29 30 31 32 33 34 35 36 37 38 39 40 41 42 43 44 45 46 47 48 #ifndef CUBIC_BEZIER_INCLUDED #define CUBIC_BEZIER_INCLUDED float t)float omt = 1 - t; float omt2 = omt * omt; float t2 = t * t; return p0 * (omt * omt2) + 3 * omt2 * t) + 3 * omt * t2) + float t)float omt = 1 - t;float omt2 = omt * omt;float t2 = t * t;3 * omt2 - 2 * omt) +-3 * t2 + 2 * t) +return normalize (tangent); #endif // CUBIC_BEZIER_INCLUDED
对草叶形状进行参数化调整 基于 Bezier 曲线导数的法线计算 1 2 3 4 5 6 7 8 9 10 11 12 13 14 15 16 17 18 19 20 21 22 23 24 25 26 27 28 29 30 31 32 33 34 35 36 37 38 39 40 41 42 43 44 45 46 47 48 49 50 51 52 53 54 55 56 57 float3 GetP0() { return float3(0 ,0 ,0 ); } float height, float tilt)float p3y = tilt * height; float p3x = sqrt (height * height - p3y * p3y); return float3(-p3x, p3y, 0 ); void GetP1P2P3(inout float3 p3, float bend, float hash, float windForce, out float3 p1, out float3 p2) 0.33 );0.66 );normalize (p3 - p0); normalize (cross (bladeDir, float3(0 ,0 ,1 ))); float p2WindEffect = sin ((_Time.y + hash * 2 * PI) * _WaveSpeed + 0.66 * 2 * PI * _SinOffsetRange) * windForce;0.66 * _WaveAmplitude; float p3WindEffect = sin ((_Time.y + hash * 2 * PI) * _WaveSpeed + 1.0 * 2 * PI * _SinOffsetRange) * windForce + _PushTipForward * (1 - bend);normalize (cross (tangent, float3(0 ,0 ,1 )));
倾斜法线技巧与圆润视觉效果 圆润视觉处理使得叶片更有厚度
玩家经常正好侧面看草坪——导致草地非常稀薄,甚至看不见。在这种情况下,垂直点可以倾斜,更朝向玩家的视角。这是通过在锯片面大致垂直于视野矢量时,稍微移动垂直点来实现的。每个顶点在该点绕贝塞尔曲线的切线旋转。
1 2 3 4 5 6 7 8 9 10 11 12 13 14 float width = blade.width * (1 - _TaperAmount * t); float side = vertColor.g * 2 - 1 ; 0 , 0 , side * width);normalize (cross (tangent, float3(0 ,0 ,1 )));normalize (curvedNorm);
将法线与远距离的表面法线混合 即使采用了时间抗锯齿,草坪在远处仍可能非常颗粒感和锯齿,因为草叶不断移动,以及光泽高光。为缓解这一问题,可以将叶片的法线偏向远距离底层地形的法线。这导致噪点和颗粒感更少,因为法线在屏幕空间中变化较小。
实现 1 2 3 4 5 6 7 8 9 10 11 12 13 14 15 16 17 18 19 20 21 22 23 24 25 26 27 28 29 30 31 32 33 34 35 36 37 38 39 40 41 42 43 44 45 46 47 48 49 50 51 52 53 54 55 56 57 58 59 60 61 62 63 64 65 66 float bend = blade.bend;float height = blade.height;float tilt = blade.tilt;float hash = blade.hash;float windForce = blade.windForce;int positionIndex = Triangles[IN.vertexID];float t = vertColor.r;float width = blade.width * (1 - _TaperAmount * t); float side = vertColor.g * 2 - 1 ; 0 , 0 , side * width);normalize (cross (tangent, float3(0 ,0 ,1 )));normalize (curvedNorm);float angle = blade.rotAngle;float sideBend = blade.sideBend;0 ,1 ,0 ));normalize (tangent));return OUT;
Pixel Shader 草叶材质与 PBR 着色
1 2 3 4 5 6 7 8 9 10 11 12 13 14 15 16 17 18 19 20 21 22 23 24 25 26 27 28 bool isFrontFace : SV_IsFrontFace) : SV_Targetnormalize (i.curvedNorm) : -reflect (-normalize (i.curvedNorm), normalize (i.originalNorm));normalize (GetCameraPositionWS() - i.positionWS);float gloss = (1 - _GrassGloss.Sample(sampler_GrassGloss, i.uv).r) * 0.2 ;1 ;0 , half3(1 ,1 ,1 ), gloss, alpha, brdfData);return half4(finalColor, grassCol.a);
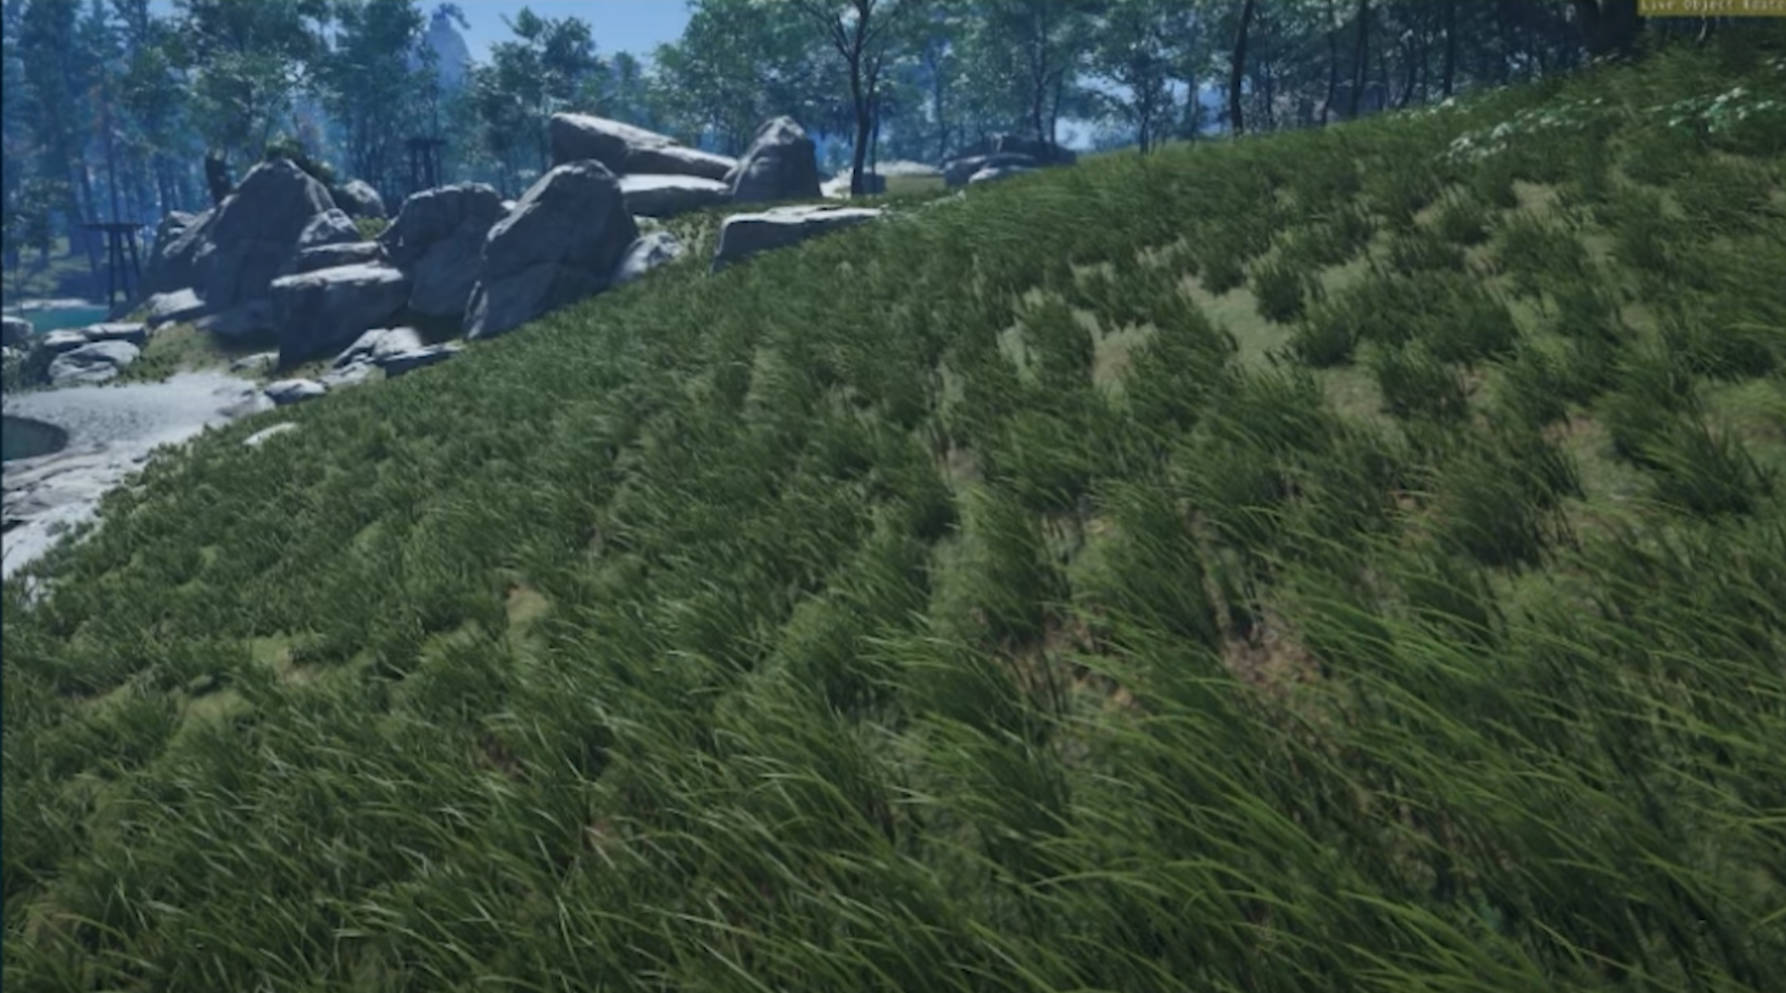
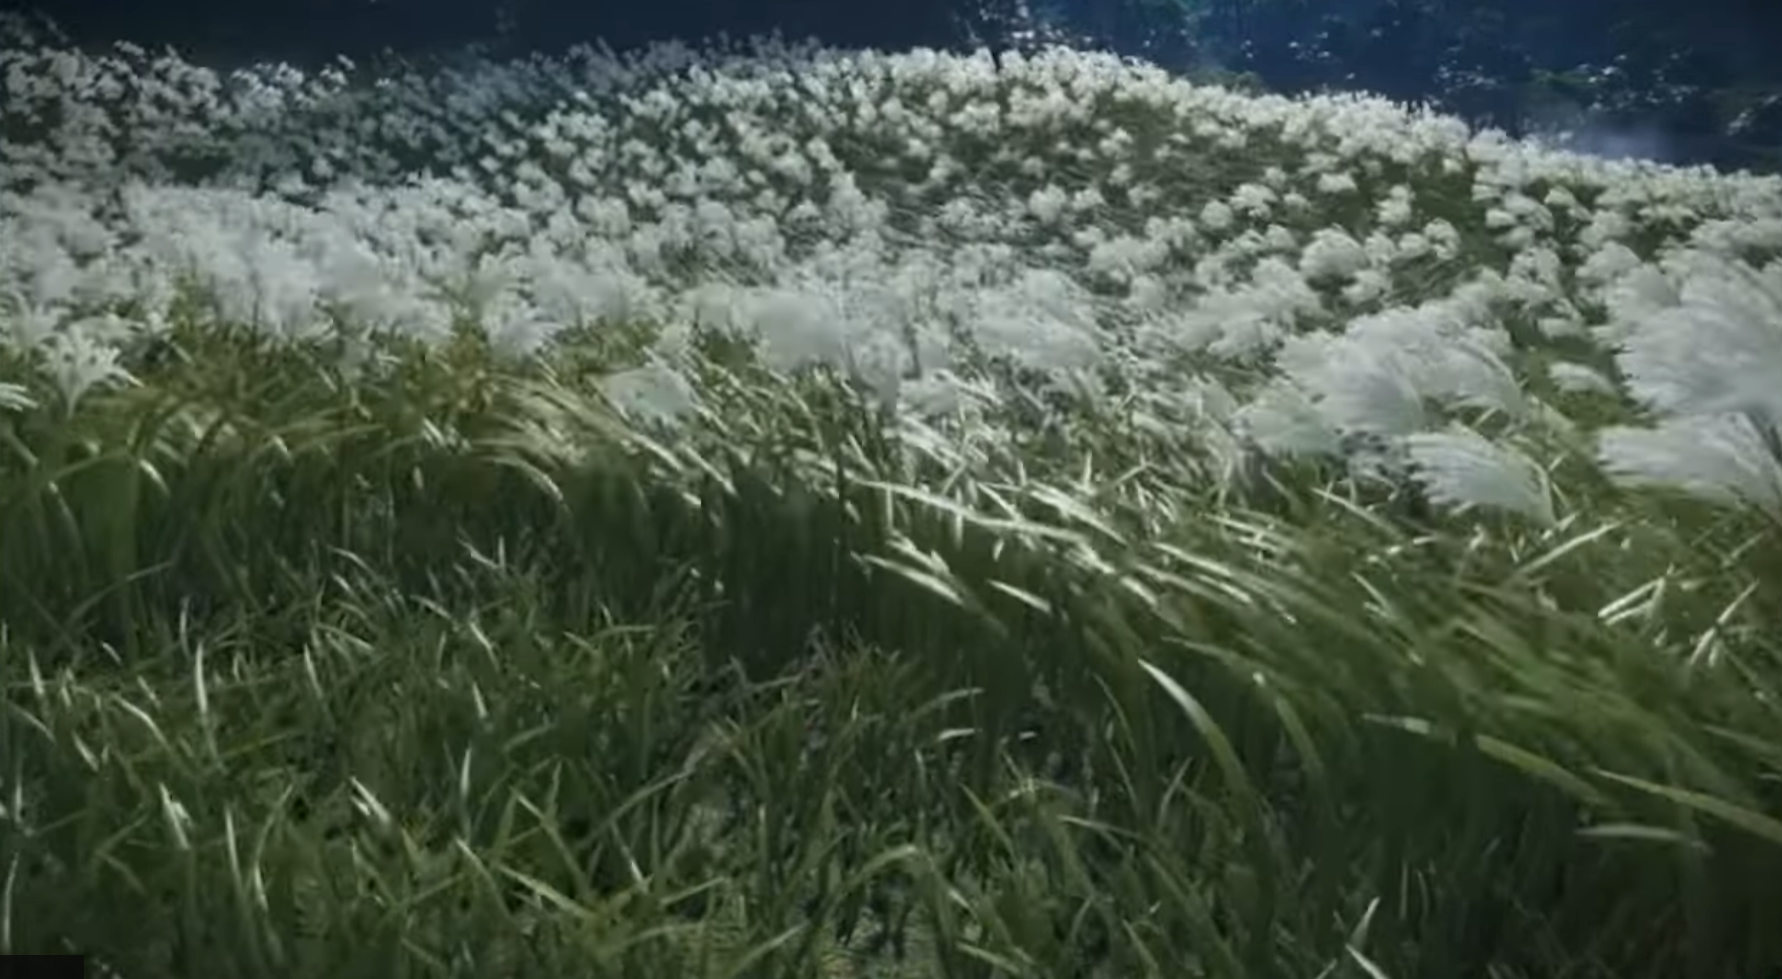
自然草丛效果 在对马岛中为了**模拟自然界中草丛生长的分布 **,提出了Clump的概念,就是一定范围内的草的朝向等属性是基本相同的,它们有统一的中心点,可以向中心点偏移来与其他Clump拉开距离。
使用**Voronoi噪声**能比较好的表现这种效果,噪声中需要使用三个通道来存储我们所需要的数据,第一个是该Clump的参数ID一个通道,第二个是Clump的中心位置两个通道。这里的Clump参数结构体用于控制一个Clump内草的行为。
Voronoi 图案与 Shader 实现 Noise
Clumping
C# 草丛 Clumping 数据结构 1 2 3 4 5 6 7 8 9 10 11 12 13 14 15 float pullToCentre; float pointInSameDirection; float baseHeight; float heightRandom; float baseWidth; float widthRandom; float baseTilt; float tiltRandom; float baseBend; float bendRandom;
Compute Shader 实现草丛 Clumping 1 2 3 4 5 6 7 8 9 10 11 12 13 0 ).xyz;float clumpParamsIndex = clumpData.x;0 , _NumClumpParameters - 1 ); int (clumpParamsIndex)];
Vertex Shader 支持草丛效果 1 2 3 4 5 6 7 8 9 10 11 12 13 14 15 16 17 18 19 float angle = blade.rotAngle;float sideBend = blade.sideBend;0 ,1 ,0 ));
程序化草地放置与高效渲染 使用 GPU Instancing 实例化渲染与配合地形高度去渲染草地
Compute Shader 程序化草叶放置
1 2 3 4 5 6 7 8 9 10 11 12 13 14 float rotAngle; float hash; float height; float width; float tilt; float bend; float windForce; float sideBend;
⭐️IndirectDraw 大规模实例化草叶渲染 使用绘制参数直接在GPU上直接进行绘制 **[ 间接绘制 GPU Instancing] **是提升性能最关键的步骤,在Unity中我们可以调用[<u><font style="color:#2F4BDA;background-color:rgb(248, 248, 250);">Graphics.DrawProceduralIndirect</u>](https://docs.unity3d.com/6000.0/Documentation/ScriptReference/Graphics.DrawProceduralIndirect.html)实现这项功能.
1 2 3 4 5 6 7 8 9 10 11 12 public static void DrawProceduralIndirect ( Material material, //草所使用的材质 Bounds bounds, //所渲染的草地的包围盒 MeshTopology topology,//这个参数可以指定五项,分别是Triangles、Quads、Lines、LineStrip、Points ComputeBuffer bufferWithArgs,//绘制参数 int argsOffset = 0 , //对于bufferWithArgs参数的偏移 Camera camera = null , //为null 就是所有相机都会执行绘制,否则就执行指定相机的绘制 MaterialPropertyBlock properties = null ,//想要单独设置的材质参数 ShadowCastingMode castShadows = ShadowCastingMode.On, bool receiveShadows = true , int layer = 0 //指定绘制对象所属的层级 )
对于<font style="color:rgb(25, 27, 31);background-color:rgb(248, 248, 250);">bufferWithArgs这个参数需要着重的说明一下, 在创建这个传递这个参数的<font style="color:rgb(25, 27, 31);background-color:rgb(248, 248, 250);">ComputeBuffer实例时,必须要指定它为<font style="color:rgb(25, 27, 31);background-color:rgb(248, 248, 250);">ComputeBufferType.IndirectArguments。
它一般有四个参数(五个的时候是用的<font style="color:rgb(25, 27, 31);background-color:rgb(248, 248, 250);">DrawProceduralIndirect的另一个重载),分别是
每个实例的顶点数 实例数 起始顶点位置 起始实例位置
后面的两个参数一般指定为0,顶点数也容易搞定,主要是**实例数的确定 可能有一些困难。
但是幸好有[<font style="color:rgb(9, 64, 142);background-color:rgb(248, 248, 250);">AppendStructuredBuffer](https://zhida.zhihu.com/search?content_id=238864402&content_type=Article&match_order=1&q=AppendStructuredBuffer&zhida_source=entity)的出现,它自带计数器,我们可以在compute shader中将数据处理完之后放到<font style="color:rgb(25, 27, 31);background-color:rgb(248, 248, 250);">AppendStructuredBuffer中,它会记录其中所存放的数据的数量, 然后我们利用<font style="color:rgb(25, 27, 31);background-color:rgb(248, 248, 250);">ComputeBuffer.CopyCount可以将实例数复制给<font style="color:rgb(25, 27, 31);background-color:rgb(248, 248, 250);">bufferWithArgs的第二个参数。需要注意的是在每次调用compute shader时需要将<font style="color:rgb(25, 27, 31);background-color:rgb(248, 248, 250);">count置为0。
1 2 3 4 5 6 7 8 _grassPropertiesBuffer.SetCounterValue(0 );0 ,groupSize,groupSize,1 );sizeof (int ));0 ,null ,null ,ShadowCastingMode.Off,true ,gameObject.layer);
由于**使用参数直接进行绘制 ,不存在实际的网格,所以在shader编写时需要注意传入参数的绑定 。我们提前将需要的数据都传入<font style="color:rgb(25, 27, 31);">StructuredBuffer中,然后根据对应的<font style="color:rgb(25, 27, 31);">ID可以获取到其中的数据。
1 2 3 4 5 6 7 8 9 10 11 12 13 14 15 16 17 StructuredBuffer<GrassPropertiesStruct>GrassProperties;int > Triangles;Varyings vert (uint vertex_id: SV_VertexID, uint instance_id: SV_InstanceID) int index=Triangles[vertex_id];
1 2 3 4 5 6 7 8 private void RenderGrass ()sizeof (int ));0 , null , null , UnityEngine.Rendering.ShadowCastingMode.Off, true , gameObject.layer);
Blade Hash 的计算与位置随机性
1 2 3 4 5 6 7 8 9 0 ,id.y) * _GrassSpacing;2 ) - 1 ) * _JitterStrength;
支持Indirect Draw 的草叶 Shader
1 2 3 4 5 6 7 8 9 10 11 12 13 14 15 16 17 18 19 float bend = blade.bend;float height = blade.height;float tilt = blade.tilt;float hash = blade.hash;float windForce = blade.windForce;int positionIndex = Triangles[IN.vertexID];float t = vertColor.r;
基于地形数据的草叶放置 1 2 3 4 5 6 7 8 9 10 11 12 13 14 15 16 17 18 19 float SampleHeight (float2 normalizedPos ) float height = UnpackHeightmap(_HeightMap.SampleLevel(LinearClampSampler, normalizedPos, 0 ));return height * _HeightMapMultiplier * 2 ; float SampleGrass (float2 normalizedPos ) float value = _DetailMap.SampleLevel(LinearClampSampler, normalizedPos, 0 ).r;return value ; if (SampleGrass(normalizedPos) < 0.1 ) return ;
基于距离与视锥的剔除优化 1 2 3 4 5 6 7 8 9 10 11 12 13 14 15 16 17 18 19 20 21 22 23 24 25 26 27 28 29 30 31 32 33 34 35 36 37 38 39 40 41 42 43 44 45 float _DistanceCullStartDist; float _DistanceCullEndDist; float _DistanceCullMinimumGrassAmount; float _FrustumCullNearOffset; float _FrustumCullEdgeOffset; uint DistanceCull(float3 worldPos, float hash)float d = distance (worldPos, _WSpaceCameraPos);float distanceSmoothStep = 1 - smoothstep (_DistanceCullStartDist, _DistanceCullEndDist, d);1 - _DistanceCullMinimumGrassAmount)) + _DistanceCullMinimumGrassAmount;return hash > 1 - distanceSmoothStep ? 1 : 0 ;uint FrustumCull(float3 worldPos)1 ));return (clipPos.z > clipPos.w0 0 :1 ;uint distanceCull = DistanceCull(position, hash.x);uint frustumCull = FrustumCull(position);if (distanceCull ==1 && frustumCull ==1 )
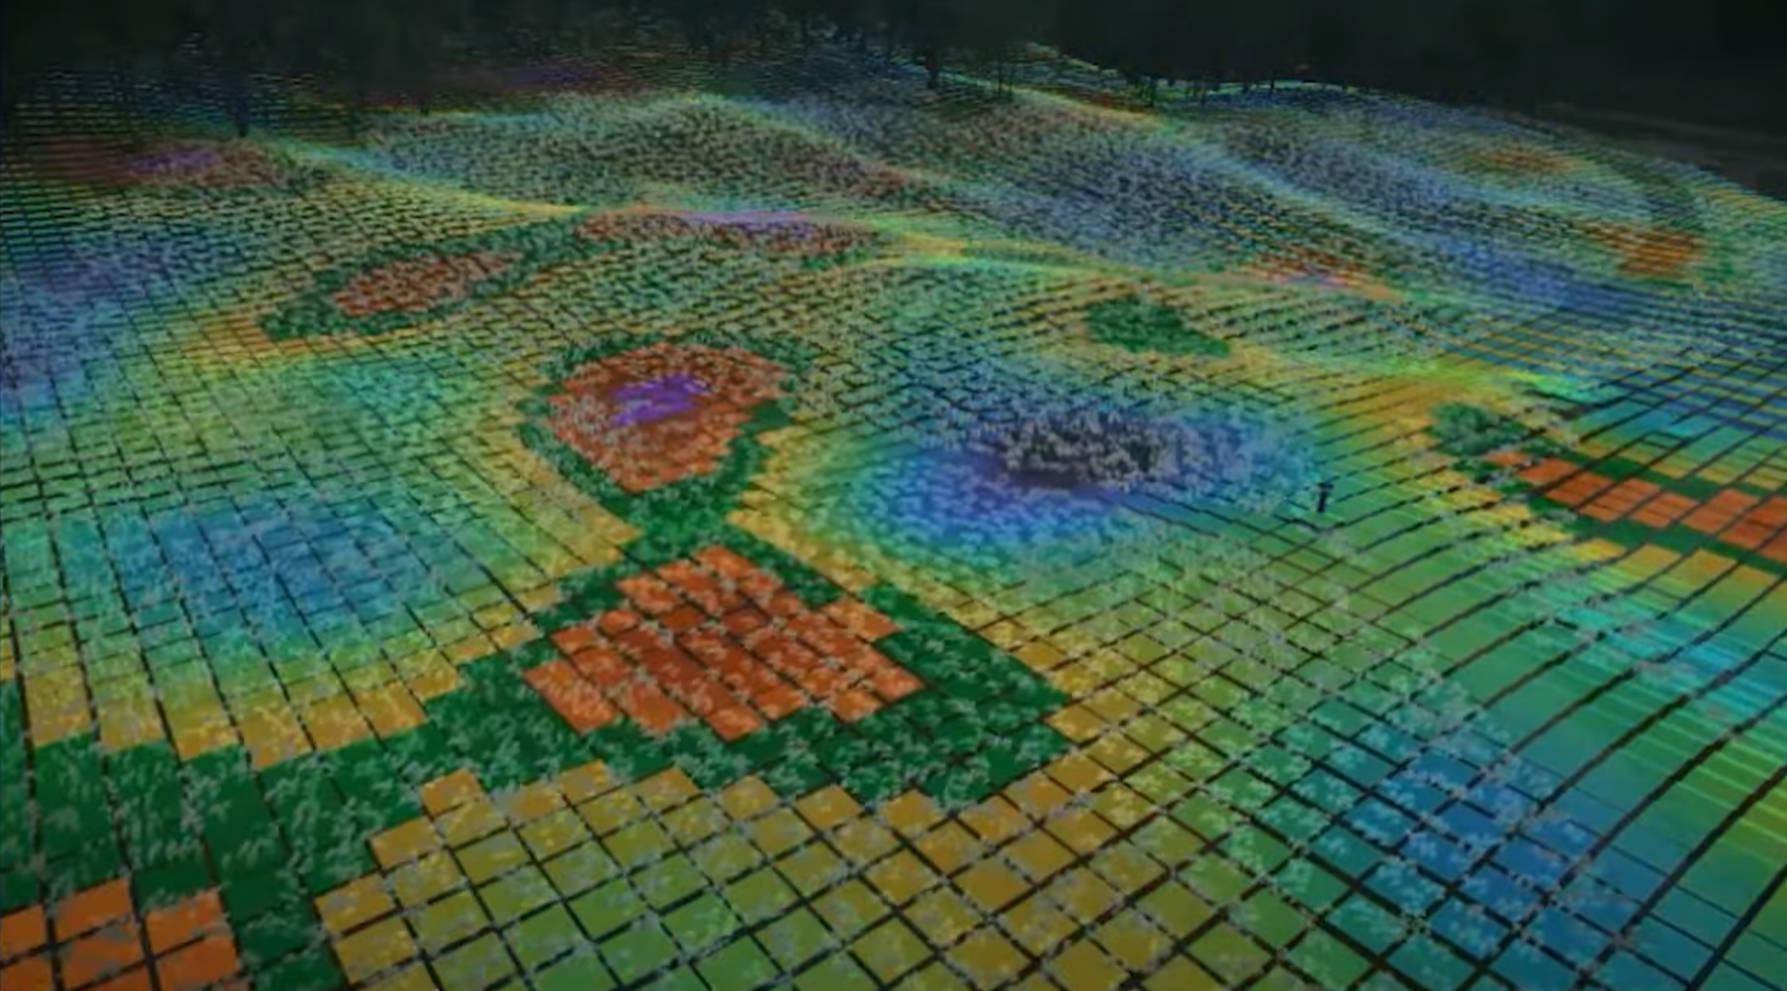
⭐Tile-Based 草地渲染优化
将地形划分为图块 Tile,
对马岛大概每 39cm 一纹素
草地 Tile 的概念与数据结构
1 2 3 4 5 6 7 8 9 10 11 12 13 14 15 16 17 18 19 20 21 22 23 24 25 26 27 28 29 30 31 32 33 34 35 36 37 38 39 40 41 42 43 44 using UnityEngine;float spaceMultiplier; int xResolutionDivisor; int zResolutionDivisor; float mul = 1 ,int xd = 1 ,int zd = 1 )
实现
基于 Tile 的草叶渲染
支持多地形和 LOD 的 Tile 生成
不同 LOD Tile 之间的平滑过渡
1 2 3 4 5 6 7 8 9 10 11 12 13 14 15 16 17 18 19 20 21 22 23 24 25 26 27 28 29 30 31 32 33 34 35 36 37 38 39 40 41 42 43 44 45 46 47 48 49 50 51 52 53 54 55 56 57 58 59 60 61 62 63 64 65 66 67 68 69 70 71 72 73 74 75 76 77 78 79 80 81 82 83 84 85 86 87 88 89 90 91 92 93 94 95 96 97 98 99 100 101 102 103 104 105 106 107 108 109 110 111 112 113 114 115 116 117 118 119 120 121 122 123 124 125 126 127 128 129 130 131 132 133 134 135 136 137 138 139 140 141 142 143 144 145 146 147 148 149 150 151 152 153 154 155 156 157 158 159 160 161 162 163 164 165 166 167 168 169 170 171 172 173 174 175 176 177 178 179 180 181 182 183 184 185 186 187 188 189 190 191 192 193 194 195 196 197 198 199 200 201 202 203 204 205 206 207 208 209 210 211 212 213 214 215 216 217 218 219 220 221 222 223 224 225 226 227 228 229 230 231 232 233 234 235 236 237 238 239 240 241 242 243 244 245 246 247 248 249 250 251 252 253 254 255 256 257 258 259 260 261 262 263 264 265 266 267 268 269 270 271 272 273 274 275 276 277 278 279 280 281 282 283 284 285 286 287 288 289 290 291 292 293 void Update ()private void UpdateGrassTiles ()foreach (Terrain terrain in terrains)if (terrain !=null )private void UpdateSurroundingTilesForTerrain (Terrain terrain )int cameraTileXIndex = Mathf.FloorToInt(cameraPositionInTerrainSpace.x / tileSizeX);int cameraTileZIndex = Mathf.FloorToInt(cameraPositionInTerrainSpace.z / tileSizeZ);if (cameraTileXIndex >= -4 && cameraTileXIndex < tileCount + 3 &&-4 && cameraTileZIndex < tileCount + 3 )new HashSet<Vector2Int>();for (int xIndex = cameraTileXIndex - 3 ; xIndex <= cameraTileXIndex + 4 ; xIndex++)for (int zIndex = cameraTileZIndex - 3 ; zIndex <= cameraTileZIndex + 4 ; zIndex++)new Vector2Int(xIndex, zIndex);if (IsStandardTile(xIndex, cameraTileXIndex) && IsStandardTile(zIndex, cameraTileZIndex) && IsTileWithinTerrainBounds(xIndex, zIndex))else bool isMerged) = CalculateMergedTileStartPosition(xIndex, zIndex, cameraTileXIndex, cameraTileZIndex);if (isMerged)private (Vector2Int, bool ) CalculateMergedTileStartPosition(int xIndex, int zIndex, int cameraTileXIndex, int cameraTileZIndex)bool isMerged = false ;if (xIndex <= cameraTileXIndex - 2 )int startZIndex = cameraTileZIndex - 3 ; int groupZIndex = (zIndex - startZIndex) / 2 ; new Vector2Int(cameraTileXIndex - 3 , startZIndex + groupZIndex * 2 );true ;else if (xIndex >= cameraTileXIndex + 3 )int startZIndex = cameraTileZIndex - 3 ;int groupZIndex = (zIndex - startZIndex) / 2 ;new Vector2Int(cameraTileXIndex + 3 , startZIndex + groupZIndex * 2 );true ;else if (zIndex <= cameraTileZIndex - 2 && IsStandardTile(xIndex, cameraTileXIndex))int startXIndex = cameraTileXIndex - 1 ; int groupXIndex = (xIndex - startXIndex) / 2 ; new Vector2Int(startXIndex + groupXIndex * 2 , cameraTileZIndex - 3 );true ;else if (zIndex >= cameraTileZIndex + 3 && IsStandardTile(xIndex, cameraTileXIndex))int startXIndex = cameraTileXIndex - 1 ;int groupXIndex = (xIndex - startXIndex) / 2 ;new Vector2Int(startXIndex + groupXIndex * 2 , cameraTileZIndex + 3 );true ;return (mergedStartPos, isMerged);private bool IsStandardTile (int tileIndex, int cameraTileIndexreturn tileIndex >=cameraTileIndex -1 && tileIndex <= cameraTileIndex +2 ; private bool IsTileWithinTerrainBounds (int xIndex,int zIndexreturn xIndex >= 0 && xIndex < tileCount && zIndex >= 0 && zIndex < tileCount;private void AddStandardTile (Terrain terrain, Vector2Int gridPosition )new Tile(terrain,tileBounds,gridPosition,1f ,1 ,1 ));private void AddMergedTiles (Terrain terrain, HashSet<Vector2Int> mergedTileGridPositions )foreach (Vector2Int gridPosition in mergedTileGridPositions)if (gridPosition.x <=-2 || gridPosition.x >=tileCount ||gridPosition.y <=-2 || gridPosition.y >=tileCount) continue ; int xResolutionDivisor = 1 ;int zResolutionDivisor = 1 ;int posX = gridPosition.x;int posY = gridPosition.y;if (gridPosition.x == -1 ) { xResolutionDivisor = 2 ; posX = 0 ; }if (gridPosition.x == tileCount - 1 ) { xResolutionDivisor = 2 ; }if (gridPosition.y == -1 ) { zResolutionDivisor = 2 ; posY = 0 ; }if (gridPosition.y == tileCount - 1 ) { zResolutionDivisor = 2 ; }2f / xResolutionDivisor, 2f / zResolutionDivisor);new Tile(terrain,mergedBounds,new Vector2Int(posX,posY),2f ,xResolutionDivisor,zResolutionDivisor));private Bounds CalculateTileBounds (Terrain terrain, int tileXIndex, int tileZIndex,float tileScaleX =1.0f ,float tileScaleZ =1.0f )new Vector3(tileXIndex * tileSizeX, -10f , tileZIndex * tileSizeZ);new Vector3(tileSizeX * tileScaleX, 20f , tileSizeZ * tileScaleZ);new Bounds();return bounds;private void AddMergedTiles (Terrain terrain, HashSet<Vector2Int> mergedTileGridPositions )foreach (Vector2Int gridPosition in mergedTileGridPositions)if (gridPosition.x <=-2 || gridPosition.x >=tileCount ||gridPosition.y <=-2 || gridPosition.y >=tileCount) continue ; int xResolutionDivisor = 1 ;int zResolutionDivisor = 1 ;int posX = gridPosition.x;int posY = gridPosition.y;if (gridPosition.x == -1 ) { xResolutionDivisor = 2 ; posX = 0 ; }if (gridPosition.x == tileCount - 1 ) { xResolutionDivisor = 2 ; }if (gridPosition.y == -1 ) { zResolutionDivisor = 2 ; posY = 0 ; }if (gridPosition.y == tileCount - 1 ) { zResolutionDivisor = 2 ; }2f / xResolutionDivisor, 2f / zResolutionDivisor);new Tile(terrain,mergedBounds,new Vector2Int(posX,posY),2f ,xResolutionDivisor,zResolutionDivisor));private void UpdateVisibleTiles ()foreach (Tile tile in tilesToRender)if (IsVisibleInFrustum(frustumPlanes,tile.bounds))private bool IsVisibleInFrustum (Plane[] planes, Bounds bounds )return GeometryUtility.TestPlanesAABB(planes, bounds);private void UpdateGpuParameters ()0 ); false );foreach (Tile tile in visibleTiles)int threadGroupsX = Mathf.CeilToInt(tileResolution / 8f * tile.xResolutionDivisor);int threadGroupsZ = Mathf.CeilToInt(tileResolution / 8f * tile.zResolutionDivisor);0 , threadGroupsX, threadGroupsZ, 1 );private void SetupComputeShaderForTile (Tile tile )if (tile.spaceMultiplier == 1 ) 0.25f ); else 0 );0 , grassBladesBufferID, grassBladesBuffer);float adjustedGrassSpacing = grassSpacing * tile.spaceMultiplier; 0 , heightMapID, terrain.terrainData.heightmapTexture);if (terrain.terrainData.alphamapTextures.Length > 0 )0 , detailMapID, terrain.terrainData.alphamapTextures[0 ]);0 , clumpParametersID, clumpParametersBuffer);0 , clumpTexID, clumpTexture);0 , LocalWindTexID, localWindTex);
其他 风力系统与动画模拟
风场 融合战神风场系统
详见 其他风场主题演讲
风的动画由滚动的2D珀林噪声驱动 [方向]。噪声被输入到一个基于正弦的函数中,该函数调制草的各种参数,如其贝塞尔控制点和朝向。
Compute Shader 中计算风力对草地运动和形态的影响
1 2 3 4 5 6 7 8 9 10 11 1 ,0.7 )* _LocalWindSpeed; float localWind =_LocalWindTex.SampleLevel(LinearRepeatSampler,localWindUV,0 ).r;float localTheta =((localWind *2 )-1 ) *3.14159 ;float rotateBladeFromLocalWindAmount =dot(grassSideVec,localWindDir);float localWindRotateAngle =rotateBladeFromLocalWindAmount *(3.14159 /2 ) *_LocalWindRotateAmount;
Vertex Shader Sine 波动函数模拟草叶摇摆动画
1 2 3 4 5 6 7 8 9 10 11 12 13 14 15 16 17 18 19 20 21 22 23 24 25 26 27 28 29 30 void GetP1P2P3 ( float3 p0, // 贝塞尔起点 inout float3 p3, // 末端点 (会被风影响侧向偏移 ) float bend, float hash, float windForce, out float3 p1, out float3 p2) 0.33 );0.66 );0 ,0 ,1 ))); float p2WindEffect = sin((_Time.y + hash * 2 * PI) * _WaveSpeed + 0.66 * 2 * PI * _SinOffsetRange) * windForce;0.66 * _WaveAmplitude; float p3WindEffect = sin((_Time.y + hash * 2 * PI) * _WaveSpeed + 1.0 * 2 * PI * _SinOffsetRange) * windForce + _PushTipForward * (1 - bend);
草地阴影 不使用时间积累 SSAO,只使用物体 AO,原因是使用 时间积累 SSAO 需要获取草地风动的速度数据,历史顶点数据,无状态的变化难以高效重建 [ 受制于性能和内存限制,不切实际 ],同时时间积累画面效果会变斑驳。
草阴影方案:
依赖利用底层地形的“冒名顶替”系统去生成草地的阴影, 我们会提升地形的顶点高度,使其与该位置草的高度相匹配,并偏移深度,以抖动模式写入阴影贴图。当我们将此与阴影过滤相结合,最终得到结果大致与草的阴影密度相匹配。
缺点 :
代理网格的离散特性,可能导致有硬边缘
之后再增加 屏幕空间阴影 Screen Space Shadow
植物散布 参考其他主题演讲
远距离草地渲染 使用艺术家提供的植物颜色纹理,避免缺乏远距离缺乏实际模型突兀变化
玩家可见性 GPU 纹理
Fizz 网格进行光线透射,以确认玩家是否可见
Future Work 后续优化
美术素材上 生成程序化草
蕨类植物等的程序化摆放
将草地分布于图块大小进一步分离,以便更容易增加草叶的距离
总结 so that’s how we rendered huge fields of grass with in our frame budget and met our art direction goals. we used compute shaders to generate per grass blade instance data that was highly artist configurable, then used indirect draw calls to get almost a hundred thousand bezier curves on screen. we supplemented these simple grass blades with procedurally placed artist assets and used very simple imposters for shadows and flower laws.
although there’s still improvements to be made we’re happy with the results we managed to achieve.
这就是我们如何在预算范围内渲染出广阔的草地,并实现我们的艺术指导目标:我们使用计算着色器生成了高度可由艺术家配置的每根草实例数据,然后通过间接绘制调用来几乎在屏幕上显示了十万条贝塞尔曲线 。我们还用程序化放置的艺术资源补充了这些简单的草叶,并为阴影和花朵使用了非常简单的替身(Imposters)。